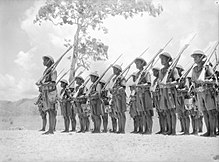
Papua Piyade Taburu - Papuan Infantry Battalion
| Papua Piyade Taburu | |
|---|---|
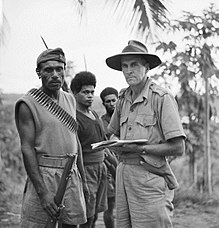
 A Company'den Çavuş Bengari, 5 Ağustos 1944 | |
| Aktif | 1940–1946 |
| Ülke | Avustralya |
| Şube | Avustralya Ordusu |
| Tür | Piyade |
| Rol | Keşif |
| Boyut | Bir tabur ~ 300-700 erkek |
| Parçası | 8. Askeri Bölge Yeni Gine Gücü |
| Garnizon / HQ | Port Moresby |
| Takma ad (lar) | "Yeşil Gölgeler" |
| Renkler | kırmızı ve yeşil |
| Etkileşimler | İkinci dünya savaşı |
| Savaş onurları | Güney Batı Pasifik 1942–45, Kokoda Yolu, Kokoda-Deniki, Nassau Körfezi, Tambu Körfezi, Finschhafen, Scarlet Plajı, Avustralya Yeni Gine'nin Kurtuluşu, Sio-Sepik Nehri, Kaboibus-Kiarivu ve Bonis-Porton |
| Komutanlar | |
| Dikkate değer komutanlar | William Watson |
| Insignia | |
| Birim renk yaması |  |
Papua Piyade Taburu (PIB) bir birimdi Avustralya Ordusu içinde büyüdü Papua Bölgesi sırasında servis için İkinci dünya savaşı. 1940'ın başlarında Port Moresby Japon istilası durumunda bölgeyi savunmaya yardımcı olmak için, askerleri öncelikle Avustralya liderliğindeki Papua yerlileriydi. memurlar ve Yetkisiz memurlar. Salgının ardından Pasifik Savaşı PIB, Yeni Gine'deki birçok Müttefik harekatında görev yaptı; bununla birlikte, rolünün doğası gereği, alt birimleri, daha büyük Avustralya ve ABD Ordusu birimlerine ve oluşumlarına bağlı olarak, çoğunlukla ayrı olarak faaliyet gösterdi. Oluşumu yavaş olan PIB'nin ilk üyeleri, Mart 1941'e kadar resmi olarak görevlendirilmedi. 1942'de sadece üç kişiden oluşuyordu. şirketler bunların hepsi güçsüz ve donanımlı değildi. Daha sonra Japonlara karşı keşif, keşif ve gözetleme devriyelerinde yerli askerlerinin doğal orman araçlarının kendi yararlarına kullanılabileceği yerlerde kullanıldı. PIB, Papua'nın kuzey kıyılarında devriye gezmek için Haziran 1942'de ileri gönderildi ve geniş bir alana dağıldı. Bu küçük partiler, Japon İmparatorluğu Katılmadan önce Papua'ya çıkaran kuvvetler Kokoda Track kampanyası. Bir parçası olarak Maroubra Gücü PIB, Avustralya ile birlikte savaştı 39 Tabur Kokoda, Deniki ve Isurava'da Japonlar onları Kokoda yolu boyunca geri zorladı, ancak kampanya sonunda Avustralyalıların lehine dönmeden önce geri çekildi.
Takiben kuzey sahil başlarının yeniden ele geçirilmesi nın-nin Buna, Gona ve Sanananda Müttefikler Yeni Gine'de saldırıya geçti. PIB, Salamaua'ya ilerle 1943'te Markham, Ramu, ve Sepik sırasında nehirler Ramu Valley - Finisterre Range kampanyası, ve Huon yarımadasında, yakalanmasına yardımcı olmak Finschhafen ve Sattelberg ve Japonları 1943–1944'te kuzey kıyı şeridi boyunca Saidor'a doğru çekilirken takip ettiler. Tabur, 1944'te yeniden düzenlenmek üzere geçici olarak operasyonlardan çekildi ve daha sonra Avustralya Ordusu tarafından yetiştirilen birkaç Yeni Gine Piyade Taburu (NGIB) ile birlikte PIB, Pasifik Adaları Alayı (PIR) Kasım 1944'te. 1945'te, Bougainville tabur şirketlerinin cephelere yayıldığı yer Bonis -e Buin savaşın son aylarında. O kadar etkiliydi ki Japonlar, beklenmedik bir şekilde ormana girip çıkma kabiliyetleri nedeniyle PIB'den "Yeşil Gölgeler" olarak bahsetti ve askerlerinin gaddarlıkları ve azimleri ile dikkat çekti. Savaşın sona ermesinden sonra tabur, Ağustos 1946'da dağılmadan önce Japon savaş esirlerini korumak için kullanıldı. 1951'de PIR, soyunu PIB ve NGIB'lerden çekerek yeniden düzenlendi.
Tarih
Oluşumu
Salgının ardından İkinci dünya savaşı içinde Avrupa 3 Eylül 1939'da, Avustralya'nın yönettiği topraklarda sınırlı savunma hazırlıkları başladı. Papua ve Yeni Gine.[1] Papua'da, Avustralyalı liderliğindeki yerli askerlerden oluşan tamamen gönüllü bir birimin yetiştirilmesi memurlar ve Yetkisiz memurlar Papua Piyade Taburu (PIB) olarak bilinen (Astsubaylar), Papua Valisi Teğmen tarafından onaylandı, Sör Hubert Murray, 19 Nisan 1940.[2][3] Bu, Yeni Gine'deki duruma zıttı. ulusların Lig hangi yetki altında Alman Yeni Gine 1920'de Avustralya'ya emanet edilmişti onun yakalanması esnasında Birinci Dünya Savaşı çatışmalardan önce orada silahlı kuvvetlerin yükselmesini engellemişti. Bu arada, sivil idarenin yerel refah ile ilgili babacan endişeleri ve yerli nüfusa silah ve askeri eğitim sağlama konusundaki huzursuzluk, onların askere alınmadığı anlamına geliyordu. Yeni Gine Gönüllü Tüfekler (NGVR), NGVR için işe alım sadece Avrupalılarla sınırlıydı.[4][5][Not 1][Not 2]

Binbaşı Leonard Logan, 27 Mayıs 1940'ta PIB'nin komutanı olarak atandı ve Port Moresby 1 Haziran.[8] Birimin kuruluşu başlangıçta bir tane ile sınırlıydı şirket 1941'de 252'ye ve 1942'de 294'e çıkarılması planlanmasına rağmen, altı subay ve 137 erkeğin olduğu.[9] Logan daha önce şirketin Genel Müdürlük göreviydi. Kraliyet Papua Polisi (RPC), Bir Şirkete komuta eden ikinci komutan tabur ve subay Binbaşı iken William Watson, bir madenci ve eski topçu subayı İlk Avustralya İmparatorluk Gücü Yeni Gine'de uzun yıllar yaşamış olan (AIF). PIB kayıtları Haziran 1940'ta başladı, ilk 63 asker RPC'nin şu anki veya eski üyeleriydi; bu, birimin 19. yüzyılın sonlarında kurulan Silahlı Yerli Constabulary'e bir soy olduğunu iddia etmesine izin veren bir bağlantı. İngiliz Yeni Gine Koruyuculuğu polisi.[10] Polis Motu tabur ortak dili olarak kabul edildi.[11][Not 3] Ücret oranları polis teşkilatınınkine eşitken, hizmet iki yıl sürdü.[12] Logan uçtu Kokoda ilk askerleri toplamak için 6 Haziran'da ve 1 Temmuz'da varan Port Moresby'ye yürüyerek geri döndü.[9]
Üç arama emri memuru Avustralya Eğitim Kolordu (AIC) boş olanları doldurmak için tabura geçici olarak gönderildi. şirket başçavuş ve takım komutanı pozisyonlar. Bu arada, ilk işe alım sürecini ve ekipman sorununu tamamladıktan sonra Konedobu, yakın Hanuabada köy, Port Moresby'den 4.8 kilometre (3.0 mil) uzakta, tabur, Port Moresby'deki Murray Kışlası'nda bir kamp tahsis edildi ve Ağustos 1940'ın sonlarında silah eğitimine başladı. Üç aylık temel eğitimin ardından PIB, Petrol depolama tesisleri, kablosuz istasyon, askeri karargah, elektrik santrali ve telefon santrali dahil olmak üzere RPC'den Port Moresby çevresindeki kilit noktaları korurken, aynı zamanda yol yapımına yardımcı oluyor ve daha fazla eğitim alıyor.[9][13] Savaş denizaşırı devam ederken kötüleşen stratejik duruma rağmen, Papua'daki yaşam biçimi, savaş öncesi yıllardan nispeten değişmeden devam etti.[9] Oluşumu yavaş olan PIB'nin ilk üyeleri resmi olarak Mart 1941'e kadar görevlendirilmedi.[3] Şu anda Papua ve Yeni Gine savunması için beklenmedik durum planları Avustralya kuvvetlerinin konuşlandırılmasını öngörüyordu. Rabaul ve Port Moresby, savunurken Lae ve Salamaua NGVR'ye bırakılacaktır.[14]
İlk hazırlıklar
Avrupa, Kuzey Afrika ve Orta Doğu'da Almanya ve İtalya ile savaş devam ederken, Avustralya'nın Pasifik'te Japonların niyetine yönelik korkuları büyüdü. Bununla birlikte, Orta Doğu'daki Avustralya askeri ve deniz kuvvetlerinin büyük çoğunluğuyla, savunma hazırlıkları sınırlı kaldı. İki tugay 8. Lig gönderildi Singapur ve daha sonra Malaya Şubat 1941'de Milis tabur, Port Moresby ve Perşembe Adası. Ek olarak, bir AIF Rabaul garnizonuna tabur Yeni Britanya ve 8. Tümenin üçüncü tugayı - Rabaul'daki tabur hariç - parça parça dağıtılacaktı. Timor ve Ambon.[15] Temmuz 1941'de 1. Bağımsız Şirket dağıtıldı Kavieng açık Yeni İrlanda havaalanını korumak için, bölümler gönderilirken Namatanai Yeni İrlanda'nın merkezinde, Vila içinde Yeni Hebridler, Tulagi açık Guadalcanal, Buka Geçidi içinde Bougainville ve Lorengau Manus Adası gözlemci olarak hareket etmek.[15][16] 2/22 Tabur 1941 Mart ve Nisan aylarında Rabaul'a gelmeye başladı, bu arada kuvvete ek birimler eklendi. Belirlenmiş Lark Kuvveti, Lakunai ve Vunakanau'daki hava alanlarını ve deniz uçağı üssünü korumak gibi görevleri arasında Simpson Limanı Japon hareketlerinin erken uyarısını sağlamak için "gelişmiş bir gözlem hattı" oluşturmanın yanı sıra.[17] Konum gittikçe savunulamaz olarak görülüyordu, ancak garnizon dört kişi ile güçlendirildi. Lockheed Hudson bombardıman uçakları ve on eskimiş CAC Wirraway keşif uçağı 24 numaralı RAAF filosu Aralık ayına kadar 1.400 erkeğe ulaştı.[15]
PIB'nin planlanan genişlemesi planlandığı gibi devam etti ve ikinci ve üçüncü şirketler 1941'de kuruldu.[18] Mayıs ayında taburun kurulması artırılmıştı ve Nisan ayında Logan hükümetten 100 asker daha istedi. B Şirketi, Buna 12 Mayıs'ta eski bir ekici olan Yüzbaşı Ernest Standfield komutasında.[9][19] Taburun oluşumu için ana argüman yerli askerlerin yerel koşullar için sağlayacağı bilginin değeri iken, birliğin genişletilmesiyle, subayların ve astsubayların çoğu Avustralya piyade, mühendis ve topçu birliklerindendi. Yerel gurbetçilerden ziyade Port Moresby'de. Nitekim, keşif ve keşif olarak tasarlanan birimin ana rolü ile - yerlilerin doğal çalılıklarından en büyük potansiyellerine kadar yararlanılabileceğinin hissedildiği görevler - yerel deneyime sahip olmayan genç liderlerin sakıncaları açıktı.[18] Yeni işe alınanların hizmet şartları, 10 ücret karşılığında üç yıllık askerliği içeriyordu. şilin ilk yıl için her ay, ikinci yıl için 15 ve bir pound üçüncüde lance onbaşı 25 şilin ödedi, onbaşı 30 şilin ve çavuşlar 40 şilin. Sağlanan ekipmanlar arasında su geçirmez bir pelerin, toka bıçağı ve kordon, yılda iki çift haki şort ve gömlek, iki yeşil kuşak, sulus cibinlik, battaniyeler, tabaklar ve yemek kapları, dokuma, tüfek, süngü ve kaskın yanı sıra çalışmak ve uyumak için. Yiyecekler polise verilenlerden daha cömertti ve tereyağı ve reçel içeriyordu.[9]
Tabur, nihayetinde Yeni Gine'deki birçok Müttefik seferinde görev yapacaktı; bununla birlikte, rolünün doğası gereği, alt birimleri, daha büyük Avustralya ve ABD birimlerine ve oluşumlarına bağlı olarak esas olarak ayrı çalışacaktı. Bu nedenle, standart Avustralya taburlarının karargahından farklı olarak, PIB'nin merkezi esas olarak bir idare ve eğitim şirketi olarak kullanıldı ve çok az eylem gördü.[20] Komutan subayın birincil rollerinden biri, tabur üyelerinin uygun şekilde kullanılmasını ve hizmetleri için tanınmasını sağlamaktı ve bu görevde düzenli olarak Avustralya Yeni Gine İdari Birimi (ANGAU) ve Yeni Gine Gücü.[21] Karargah Şirketi de taburu içeriyordu Q Store. Herhangi bir Avustralya biriminin ihtiyaç duyduğu olağan ekipmanı bulundurmanın yanı sıra, PIB'nin benzersiz yapısı nedeniyle, yerel askerler tarafından ihtiyaç duyulan özel yiyecek ve kıyafetleri elde etme gibi ek zorluklar da vardı. Sinyaller Bölümü, tabur içinde ve Port Moresby bölgesindeki diğer birimlerle saha telefonuyla iletişimin sürdürülmesinden sorumluydu ve bölüme Papualılar ve Yeni Gineliler, santralin ve hat ekipmanının bakım ve çalıştırmasının tüm yönlerini öğretiyordu. Savaş Kuruluşu, Alaylı Tıp Görevlisi ve tıbbi görevliler (tüm Avrupalılar) için sağlanmasına rağmen, Haziran 1943'e kadar birime kalıcı tıbbi personel gönderilmemiştir. Bundan önce, siparişler ANGAU tarafından ekli olarak sağlanmıştır, ancak sonraki operasyonlar sırasında bazı durumlar olmuştur. erkekler tıbbi destek almadıklarında veya ABD Ordusu sağlık görevlileri tarafından desteklendiklerinde.[22]
Ağustos 1941'e kadar PIB, savunmasız noktaları korumak, yollar inşa etmek ve rıhtımlarda çalışmak için kullanılmaya devam ederken, bu süre zarfında daha fazla eğitim de verildi. Bununla birlikte, Eylül ayında birime bölgeyi Napa Napa'dan Jolers Körfezi'ne kadar savunma görevi verildi. Bir keşfin ardından, A ve B Şirketleri kendilerine ayrılan bölgelere taşındı ve taktik hareket ve savunma pozisyonları için yollar inşa etmeye başladı.[23] Kilit tesislerde koruma sağlamaya devam edilmesi gerekmesine rağmen, bunu yoğun bir eğitim dönemi izledi.[24] Ağustos'ta Logan taburun genişlemesine devam etmek için 107 asker daha aradı ve Kasım 1941'de C Şirketi kuruldu.[25] Bu arada, Standfield ve Watson da dahil olmak üzere taburdan bir dizi diğer subay Yeni Gine merkezli çeşitli karargah ve birimlere ayrıldıktan sonra Teğmen Alan Hooper, B Bölüğüne komuta eden subay olarak devraldı. Watson, Üs Karargahına sivil işe alma memuru olarak atandı, Standfield ise tedarik hattında çalışmak üzere ayrıntılı olarak görevlendirildi. Bulldog'dan gelen yol -e Wau savunma hazırlıkları devam ederken.[23] 1 Aralık'ta, A Company savunma işlerinden çekildi ve Port Moresby'deki rıhtımda kargoyu gemiden boşaltmakla görevlendirildi.[26]
Pasifik'te savaş patlaması
Japonlar, kısa bir süre sonra Rabaul üzerinde hava keşiflerine başladı. Pearl Harbor'a saldırı 7 Aralık 1941 ve 12 Aralık'ta geri kalan tüm Avrupalı kadın ve çocukların Avustralya'ya zorunlu tahliyesi emredildi.[14] ABD filosuna A Company'ye yapılan sürpriz saldırının ardından PIB, rıhtımdaki gemileri savunma pozisyonlarında görevlendirmek ve 24 saat nöbet tutmak üzere boşaltma görevinden alındı.[23][26] Bu arada, kuzeydeki adalara dağılmış olan 1. Bağımsız Şirket'in 270 adamının hepsi Rabaul ile büyük Japon üssü arasında uzanıyordu. Truk Caroline Adaları'nda.[15] Papua'daki Avustralya savunmaları sınırlı kaldı ve Port Moresby'de yoğunlaştı, yaklaşık 1.000 sadece kısmen eğitilmiş Milislerden oluşan 49 Tabur, iki altı inçlik kıyı silahı, 3,7 inçlik bir uçaksavar bataryası ve birkaç Konsolide PBY Catalina hala oluşmakta olan yerel olarak işe alınmış PIB ve yarı zamanlı gönüllü NGVR'ye ek olarak uçan tekneler.[27][28][29] Bu kuvvetler, operasyonel komuta altına geldi. 8. Askeri Bölge komuta eden Tümgeneral Basil Morris.[30] Bununla birlikte, Japonların yakında Rabaul ve Port Mores'i geri kalanı tarafından ele geçirme girişiminde bulunmaları bekleniyor. 30 Tugay ile öne çıkarıldı 39 ve 53. Tabur 3 Ocak'ta Port Moresby'ye varıyor.[31] Bu birimler yavaş yavaş PIB'nin savunma görevlerini devraldı ve tabur bir öncü rol.[23] Morris daha sonra NGVR ve PIB'yi keşif ekranının bir parçası olarak geniş bir alana yaymayı planladı.[18]
Rabaul'a ilk hava saldırıları 4 Ocak 1942'de başladı. Japonlar birkaç gün içinde savunan uçağın büyük kısmını yok etmeyi başardı, diğer saldırılar ise liman ve kıyı tesislerini hedef aldı. Yarbay John Scanlan bir bütüne ihtiyacı olacağını düşündü tugay Rabaul'u savunmak için, ancak yakında bir istila ile yapabileceği tek şey, sınırlı gücünün bir kısmını yeniden konuşlandırırken, kalan uçaklar geri çekildi ve hava alanları krater haline getirildi.[17] Japonlar Güney Deniz Kuvvetleri Tümgeneral komutasındaki yaklaşık 5,300 askerden Tomitarō Horii 23 Ocak 1942'nin erken saatlerinde Rabaul'a indi.[15][32] Sayıca üstün olan Lark Force, hızla istila edildi. ardından gelen kavga Japonlar kasabanın ele geçirilmesini 24 saat içinde tamamlıyor. Avustralya kayıpları ağırdı, 28 kişi öldürüldü ve savunucuların çoğu yakalandı.[33] Hayatta kalanlar, sonunda tahliye için New Britain üzerinden güneye Open Bay ve Wide Bay bölgelerine ve batıya doğru hareket ederek iç kısma çekildiler. Toplamda 400'den fazla asker ve sivil kaçtı.[28] Çoğu daha az şanslıydı. Toplam 160 yaralı ve hasta Avustralyalı asker yakalandı ve ardından Tol Plantation'da Japonlar tarafından öldürüldü.[33] Daha sonra Japon deniz hapishanesi gemisi Montevideo Maru batı kıyısında battı Luzon içinde Güney Çin Denizi 1 Temmuz 1942'de denizaltı tarafından torpillendikten sonra USS mersin balığı, çoğu Avustralyalı siviller ve Rabaul'dan savaş esirleri olmak üzere 1.035 kişinin hayatını kaybetmesine neden oldu.[34]
Japon çıkarma, Mart 1942
1942'ye gelindiğinde, PIB yalnızca üç yetersiz güçlü ve yetersiz donanımlı şirketten oluşuyordu. Toplam işgücü yaklaşık 300 yerli Papualıyı içeriyordu.[10] Ocak ayının sonlarında, PIB Hanuabada'dan 9 Mil alanına taşınmış ve hava alanı geliştirme için taş ocağından kaya tedarik etmek ve aynı zamanda dağılma koyları inşa etmekle görevlendirilmiştir. 7 Millik Uçak Pisti.[23] PIB daha sonra Redscar Körfezi'nden Rigo'ya ve iç kesimlerin eteklerine kadar bir dizi küçük devriye gezdi. Owen Stanley Sıradağları Bu, ağır işçiliğin ara sıra bir rahatlama işlevi gördü.[26] Bu devriyeler, yakınlarda Obu'ya gönderilen bir dizi küçük keşif grubundan oluşuyordu. Yule Adası içinde Papua Körfezi, en az onun kadar Hisiu batı kıyısında, Rigo ve Owen Stanley Range. Bu taraflar, Japon paraşütçülerinin olası sızmasına karşı uyanık olmaları ve düşürülen Müttefik hava mürettebatını kurtarmaları için ayrıntılıydı.[35] Port Moresby, birçok ağır hava saldırısının ilki olan 3 Şubat sabahı 03: 00'te Japon uçakları tarafından bombalandı. Müttefik hava savunmaları neredeyse hiç yoktu ve baskınlar sivillerin moralini önemli ölçüde düşürürken, birkaç PIB üyesi firar etti.[26] Port Moresby'nin bombalanmasının ardından Şubat ayı başlarında Papua'daki sivil idarenin yerini askeri kontrol aldı. ANGAU, aceleyle birleşmelerinin ardından, birleşik bir askeri hükümette hem Papua'yı hem de Yeni Gine'yi yönetmek için kuruldu.[36]
Watson, çatışmalar başladıktan kısa bir süre sonra geri çağrıldı ve Logan'ın yerine 16 Şubat'ta PIB'nin komutanı olarak, daha sonra hastalık nedeniyle Papua'dan tahliye edildikten ve emekli olmaya zorlandı.[18][26][37] PIB daha sonra Japonlara karşı keşif, keşif ve gözetleme devriyelerinde kullanıldı.[38] 19 Şubat'ta, Teğmen Harold Jesser'in komutasındaki A Bölüğünden bir müfrezeye Morris tarafından, Buna ile Güney Afrika arasında Papua'nın kuzey kıyısında devriye gezmesi emri verildi. Waria Nehri, diğer takımlar Port Moresby'ye olası yaklaşma yollarını tararken, A Company'den 20 Şubat'ta Rigo'ya giden ikinci bir devriye ve bir hafta sonra üçüncüsü ile.[18][39] 8 Mart 1942'de, yaklaşık 3.000 Japon deniz birliği Lae'ye karşı çıkmadan, NGVR müfrezesini batıya doğru çekilmeye zorladı. Nadzab Japon Güney Deniz Kuvvetleri'nden bir başka tabur aynı gün Salamaua'ya daha güneye indi. İnişleri gözlemledikten sonra, başka bir NGVR müfrezesi Japonlarla çarpıştı ve Francisco Nehri boyunca geri çekilmeden önce havaalanını yıkmaya çalıştı, giderken nehir ağzındaki köprüyü yok etti. Japonlar daha sonra Salamaua'yı işgal etti ve nehirdeki bir bölümü terk ettikten sonra NGVR'nin adamları güneye taşındı. Mubo.[40]
Japonlar şimdi Port Moresby'nin 160 kilometre (100 mil) içindeydiler, ancak kazanımlarını pekiştirmek için duraklamaları gerekiyordu, bu da Müttefiklerin Avustralya'yı takviye etmesine izin verdi.[37] Gelene kadar bölgedeki tek Müttefik kuvvet olmak Kanga Gücü Mayıs ayında Wau'da NGVR, daha sonra burada kurulan Japon üslerini izledi. Huon Körfezi bölgesi, ana yaklaşımları gözden kaçıran gözlem noktaları kurmak ve Japon hareketleri hakkında rapor vermek.[41] Bu arada, ABD Beşinci Hava Kuvvetleri Lae, Salamaua ve Rabaul'daki Japon mevkilerine karşı bombalama operasyonlarına başlayarak Port Moresby'ye varmaya başladı ve PIB, düşürülen havacılar için arama ve kurtarma görevini üstlendi.[37] 11 Mart'ta Jesser ve PIB'nin bir bölümü ile Onbaşı Kimani Buna'daydı ve buna o gün bir Japon çıkarmasının beklendiği tavsiyesine cevaben bütün gece Kokoda'dan yürüdüler. Bir Japon gözlemlemek için zamanında gelmişlerdi deniz uçağı ateş etmek başlatmak Anglikan misyonuna ve yerel piskopos (Piskopos Strong) dahil bir grup sivil. Deniz uçağı, Buna yakınlarında 275 metre (300 yarda) denize indi.[39]. Jesser ve Kimani, uçağı tüfeklerle çalıştırarak uçağı indirdiler.[42] 21 Mart'ta, Port Moresby'deki kuşatılmış garnizon, geminin gelişiyle güçlendirildi. Kittyhawk savaşçıları itibaren 75 numaralı RAAF filosu.[43] Mart, Nisan ve Mayıs ayları boyunca PIB devriye gezmeye devam ederken, bu operasyonlarda yer almayan kişiler Port Moresby'deki taş ocağında ve havaalanında istihdam edildi.[37] Bu dönemde Japonlarla hiçbir temas kurulmadı.[39]
Buna'dan Kokoda'ya, Haziran 1942 - Ocak 1943
Onların yenilgisinin ardından Mercan Denizi Savaşı Mayıs ayı başlarında Port Moresby'ye giden Japon işgal filosu geri dönmek zorunda kaldı, 4 Haziran'da Japonlar kararlı bir şekilde Midway'de dövüldü ABD Donanması tarafından. Bu aksiliklere rağmen, Rabaul ve Lae'deki Japon güçleri, Kuzey Papua'dan Buna ve Kokoda üzerinden Port Moresby'ye bir saldırı hazırlıyor gibi görünüyordu.[44][39] Bu süre zarfında, içindeki tek Müttefik birim Güney Batı Pasifik Bölgesi Japonlarla hala aktif olarak meşgul olan, NGVR ve 1st ve 1'den oluşan Kanga Force'du. 2/5 Bağımsız Şirketler Lae ve Salamaua çevresinde Japonlara karşı bir gerilla kampanyası yürütüyordu.[45] Haziran 1942'de Morris, PIB'yi Awala'yı yeniden tanımakla görevlendirdi.Tufi –Ioma bölgesi.[39] Müttefikler, Japon tehdidini karşılamak için Buna'da uçak pistleri inşa etmeyi planladılar.Dobodura Rabaul'a karşı operasyonları kolaylaştırmak ve bu yönden herhangi bir ilerlemeyi önlemek için onu güvence altına almak için alan.[46] Durum kötüleştikçe, sadece 30 subay ve 280 adamdan oluşan PIB, Papua'nın kuzey sahilinde devriye gezmek üzere gönderildi ve ardından geniş bir alana dağıldı. 39. Tabur (bir şirket daha az) ve tedarik ve tıbbi müfrezelerle birlikte, Maroubra Gücü.[47]

Yarbay komutasında William Owen 39. Tabur'un komutanı Maroubra Force, Awala'dan Kokoda'ya bir Japon ilerlemesini ertelemek, Kokoda yakınlarındaki Owen Stanley Range'deki bir boşluktan Port Moresby'ye doğru hareketi önlemek ve bölgedeki herhangi bir hava inişine direnmekle görevlendirildi.[47][Not 4] Teğmen Arthur Smith komutasındaki B Bölüğü'nden PIB, 7 Haziran'da Barena – Buna bölgesinde devriye gezmek için Port Moresby'den ayrıldı ve şirketin geri kalanı 14 Haziran'da Hooper'ın komutasında Ioma'da devriye gezmekle görevlendirildi. Mambare, Morobe, Waria Nehri ve Garaina bölgeleri. Teğmen John Izatt komutasındaki A Bölüğünden bir müfreze, Waria Nehri'nde zaten pozisyondaydı ve B Bölüğüne bağlıydı. 24 Haziran'da Watson ve C Şirketi altındaki tabur karargahı Port Moresby'den Kokoda – Awala bölgesine taşındı.[44] Bu arada, B Bölüğü 39. Tabur, kara yoluyla karadan gönderildi. Kokoda Parça Buna bölgesini güvence altına almak ve herhangi bir Japon ilerlemesine karşı çıkmaya hazırlanmak için, PIB zaten Kokoda Pisti'nin girişinde Owen Stanley Range'in kuzeyindeydi. Maroubra Kuvvetleri 15 Temmuz'da Kokoda'ya geldi.[49] Yine de, Müttefiklerin ilk devriyelerine ve bölgedeki mühendis keşiflerine rağmen, Japonlar nihayetinde inisiyatifi ele geçirerek daha hızlı hareket edebildi.[46] Sonuç olarak, bu küçük partiler nihayetinde ilk temasa geçenler olacaktır. Japon İmparatorluğu Papua'ya indiklerinde kuvvetler.[50]
Yeni Gine'nin kuzey kesiminin çoğunu 1942'nin başlarında ele geçiren Japonlar, Papua'nın kuzeydoğu sahiline indi, kurma sahil başları Buna şirketinde, Gona ve Sanananda.[51] 21/22 Temmuz gecesi 3.000 Japon, Avustralya'yı Amerika Birleşik Devletleri'nden izole etme stratejisinin bir parçası olarak Port Moresby'yi ele geçirmek için Owen Stanley Sıradağları'nın dağları boyunca güneye doğru ilerlemek amacıyla Gona yakınlarında karaya çıktı. Başlangıçta bunlara karşı sadece sınırlı sayıda Avustralya kuvvetleri mevcuttu ve hızlı ilerleme kaydettikten sonra, Horii komutasındaki Japon Güney Deniz Kuvvetleri, 23 Temmuz'da Awala'da az kuvvetli Avustralyalı kuvvetlerle çatışarak onları Kokoda'ya geri döndürdü.[52][53] PIB'nin ilk angajmanı sırasında Teğmen John Chalk 'nın müfrezesi, Kokoda'ya doğru ilerleyen Japon birliklerinin pusuya katılmıştı. Tebeşir ve bir izci grubu 22 Temmuz gecesi Sangara'ya taşınarak orada bir Japon kuvvetinin kamp kurduğunu gözlemlediler. Ertesi sabah, koşucu tarafından gelişlerini bildirdi ve Watson tarafından onlarla meşgul olmaları emredildi. O gece Chalk ve 40 kişilik müfrezesi, Japon kuvvetlerini Gona'ya bakan bir tepeden pusuya düşürdü.Sangara yol, küçük silahlar ve havan ateşiyle çabucak karşılık verdikleri için ormana çekilmeden önce birkaç kişiyi öldürdü.[54][55][Not 5] Bu arada, Yüzbaşı komutasındaki 39. Tabur B Bölüğünün unsurları Sam Templeton gelmeye başlamıştı ve Papua'nın geri çekilmesini örtbas etmek için hareket ettiler.[56] Karışıklıkta Awala'daki bazı PIB askerleri kaçtı, ancak birkaçı Avustralyalılarla geri çekildi.[57][Not 6]
Watson daha sonra karargahıyla Awala'dan Ongahambo'ya çekildi, ancak kısa süre sonra geri çekilmek zorunda kaldı. Wairope. Bu arada Jesser'in kuzey kanadındaki partisi kesilme tehlikesiyle karşı karşıyaydı. Çalılıkların arasından Wairope'a doğru ilerlediklerinde, ertesi sabah Watson'ın tel yaya köprüsünün yıkılması emrini verdiğini ve yüzmek zorunda kaldığını gördüler Kumusi Nehri kaçmak. Watson daha sonra Kokoda'ya yakın Gorari'de emekli olurken, PIB ve B Şirketi'nin büyük bölümü olan 39. Tabur batı yakasında kaldı. PIB daha sonra Templeton komutasındaki bir müfreze katıldı ve ertesi gün Japonları kauçuk botlarla Kumusi'yi geçerken pusuya düşürdü. Geri çekilmek zorunda kalan Japonlar, onları kuşatmak için geçmeden önce nehir boyunca ilerlemeye başladı. Avustralyalılara ve Papualılara havan ve ağır makineli tüfeklerle saldıran birçok PIB askeri, yine çalıların içine çekildi. Bazıları sonunda ana partiyle bir araya geldi ve diğerleri Kokoda'ya geri döndü, ancak çoğu terk edildi.[58] PIB ve B Şirketi'nin unsurları olan 39. Tabur, 25 Temmuz'da Gorari'de Japonlarla tekrar çatışarak 15'i öldürdü ya da yaraladı. Ancak yalnızca birkaç Avustralyalı subay ve Astsubay ve bir avuç Papualıya düşürülen kuvvet 39'la Oivi'ye çekildi. Altı kişiyi kaybettikten sonra tabur kayıp.[59] Adamlarının durumundan endişe duyan ve Kokoda ile C Şirketi arasında hiçbir Avustralyalı asker bulunmayan 39. Tabur (23.'de Illolo'dan ayrılan ve hala pistte ilerliyordu) Owen, takviye kuvvetlerinin gönderilmesini istedi.[60] Avusturyalılar ve Papualılar ilerlemeyi durdurmak umuduyla 26/27 Temmuz gecesi Oivi'yi kazdılar, ancak Japonlar çok güçlü olduklarını kanıtladılar ve savunmacılar bir kez daha geri püskürtüldü. Templeton öldürüldü ve Watson, 27 Temmuz'da Deniki aracılığıyla komutayı ele geçirdi.[58]
Deniki'de B Bölüğünün geri kalanına katıldılar, 39. Tabur şimdi bizzat yönetilen Owen tarafından yönetiliyordu.[61] Kokoda'ya geri döndüklerinde, Oivi'de bağlantısı kesilen birkaç adam tarafından da yeniden birleştiler.[58] Owen, takviye kuvvetlerinin kendisini desteklemek için zamanında ulaşması umuduyla Kokoda uçak pistini savunmaya karar verdi. Deniki'de yaklaşık 40 asker bırakarak, kalan 77 kişiyi aldı ve 28 Temmuz öğlene kadar Kokoda çevresinde konuşlandırıldı.[61] Maroubra Force, Japonları ilk başarısız savunma 28/29 Temmuz 1942 gecesi Kokoda uçak pistinin inişine geçti. 29 Temmuz saat 02: 00'de Japonlar, mevziinin kuzey ucundaki dik yokuşa saldırmadan önce makineli tüfek ateşiyle desteklenen bir havan ateşi başlattı. Owen öldürüldü ve Watson tekrar geçici olarak komuta ederek, Kokoda Pisti boyunca 1 mil (1.6 km) geri Deniki köyüne doğru bir çatışmaya yol açtı. Isurava. Cesareti ve liderliği için Watson daha sonra Seçkin Hizmet Siparişi.[62] Kokoda'daki Avustralya kayıpları iki ölü ve yedi veya sekiz yaralıydı; ancak, savaş sırasında çok daha fazlası kesildi ve kayboldu.[63] Bu arada Smith, Japonların Kumusi Nehri ağzına indiğini bildirirken, Izatt 1 Ağustos'ta oradaki hükümet istasyonunu yıktıktan sonra Ioma'dan çekilmek zorunda kaldığını bildirdi. Yiyecekleri azaldığında, Waria-Opi Nehri bölgesinde faaliyet gösteren Hooper yönetimindeki PIB, B Şirketi ile iletişime geçmeye çalıştı. Iomai-Warioa-Ambasi bölgesinde faaliyet gösteren PIB devriyelerine Watson tarafından yerinde kalmaları ve Japonlarla teması sürdürme emri verildi.[62]
Kokoda'daki uçak pistinin kaybı, Avustralyalıları 39. Tabur'un diğer iki bölüğünü ve 30. Tugay'ın kalan taburlarını - 49. ve 53. Taburları - hava yoluyla takviye etmek yerine karaya göndermeye zorladı.[Not 7] Bu arada, yaralıların artık yerli hamallar tarafından taşınması gerekecekti ve hava attı. 30. Tugay'ın tümgenerali Binbaşı Allan Cameron, 4 Ağustos'ta geçici olarak Maroubra Gücünün komutasını devraldı ve Kokoda'yı yeniden ele geçirmesi emredildi.[67] Ağustos ayının ilk haftasında, hem A hem de C Bölüğü, 39. Tabur dahil olmak üzere, takviye kuvvetleri Deniki'ye ulaştı ve diğer kuvvetler Kokoda Pisti'nde ilerliyordu. Avustralya kuvveti şimdi 31 subaydan ve 39. Tabur'un diğer 443 rütbesinden oluşuyordu; sekiz Avustralyalı ve PIB'nin 35 yerli birliği; ve ANGAU'nun iki subayı ve 12 yerli üyesi; toplam 533 erkek.[62][67] Yetersiz donanımlı ve malzeme sıkıntısı olmasına rağmen Cameron, Kokoda'da tahmini 300 ila 400 kişilik bir Japon gücüne saldırmayı planladı.[62] Avustralyalılar 8 Ağustos'ta Kokoda'yı geri almaya çalıştı, ancak her iki taraf da ağır kayıplar vererek 39. Tabur ve PIB Deniki'ye geri çekildi. Sonraki hafta bir dizi Japon saldırısını alt etmelerine rağmen, 14 Ağustos'ta Owen Stanley Range üzerinden Isurava'ya çekilmeye başlamak zorunda kaldılar.[52]
Çatışmanın zirvesinde Korgeneral Sydney Rowell 's Ben Kolordu karargah Port Moresby'ye ulaştı ve Yeni Gine Kuvvetlerinin komutasını 12 Ağustos 1942'de Morris'ten devraldı.[68][69] Blamey daha sonra Tümgeneral Arthur Allen deneyimli Avustralyalı 7. Lig - Yakın zamanda Orta Doğu'daki savaştan döndü - Yeni Gine'ye gitmek için. 18 Tugay emredildi Milne Körfezi iken 21 inci ve 25 Tugaylar Port Moresby'ye gidecekti.[70] Japonlar, Ağustos ayına kadar 13.500 erkeğin Gona ve Buna'ya inmesiyle Kokoda Pisti boyunca savaşa adam ve malzeme sağlamaya devam etti.[71] Yine de Japonlar, Deniki'den çekilmelerinin ardından Avustralyalılara baskı yapmadı ve sonraki 10 gün boyunca 39. Tabur ve PIB, 53. Tabur ve 30. Tugay karargahı tarafından Tuğgeneral komutasındaki takviye edildi. Selwyn Porter. 23 Ağustos'ta Tuğgeneral komutasındaki 21. Tugay da Isurava'ya gelmişti. Arnold Potts. Bu takviyelerin Japon ilerlemesini geçici olarak durdurmada çok önemli olduğu kanıtlandı, ancak Avustralyalılar giderek büyük bir tedarik sorunuyla karşı karşıya kaldılar ve 39. Tabur lojistik yükünü azaltmak için geri çekildi.[52]
25 Ağustos 1942 akşamı Japonlar bir Milne Koyu'na iniş, Yeni Gine'nin doğu ucunda, orada kurulan Müttefik hava alanlarını küçültmek için.[46][69] İlk başarıya rağmen, kuvvet daha sonra 4–5 Eylül tarihlerinde deniz yoluyla tahliye edilmeye zorlanan hayatta kalanlar ile Avustralyalılar tarafından imha edildi. Bu arada, bu süre boyunca Horii'nin Güney Denizleri Müfrezesi, Kokoda Pisti boyunca güçlü ilerleme kaydetmeye devam etti.[46] Japonlar 26 Ağustos'ta ilerlemeye devam ettikten sonra, Avustralyalılar daha önce bir dizi erteleme eylemi düzenlediler. Eora Deresi'ne geri dönmek 30 Ağustos'ta, 2 Eylül'de Templeton's Crossing'de ve Efogi üç gün sonra. Sayıca az olan Avustralya muhalefetinin giderek daha etkili hale gelmesine ve Japonların aşırı genişletilmiş bir tedarik hattının gerginliğini yaşamaya başlamasına rağmen, savunucular gittikçe yoruldu ve çabalarının ve zorlu arazinin bir sonucu olarak hastalık ve hastalık yüzünden azaldılar. Potts, komutayı 10 Eylül'de Porter'a devretti ve ardından ertesi gün orada bir Japon saldırısını kontrol ederek Ioribaiwa'ya çekildi.[52] Allen'ın 7. Tümeni tugayları artık Maroubra Kuvvetlerini güçlendirirken, PIB sedye taşıyıcılarından oluşan ekipler halinde organize edildi ve hasta ve yaralı Avustralyalı askerleri Kokoda Pisti boyunca tahliye etme görevi verildi.[10] 14 Eylül'de ileri bölgelerin komutanlığı Tuğgeneral tarafından devralındı. Kenneth Eather.[52]
Ağır Ioribaiwa çevresinde savaş devam etti Avustralyalılar yeniden zorla geri gönderilmeden önce, ertesi hafta bu kez Imita Ridge'e gitti. 17 Eylül'de Japonlar neredeyse Port Moresby'nin görüşüne girmişlerdi.[52] Ancak, ağır bir Guadalcanal'da yenilgi, Horii'ye savunmaya geçme emri verildi ve bu Japon ilerlemesinin sınırı olduğunu kanıtladı.[46] Eylül ortasına kadar PIB önden çekildi ve mola vermek ve yeniden donatmak için Port Moresby yakınlarındaki Sogeri'ye geri taşındı. A small detachment of two Australian sergeants and six Papuans remained at Uberi Village at the southern end of the Kokoda Track, from where they carried out patrols under the command of the 25th Brigade.[72] The Japanese began to withdraw from Kokoda on 24 September to establish a defensive position on the north coast, but were closely followed by the Australians who recaptured Kokoda on 2 November. Further fighting continued into November and December as Australian and US forces assaulted the Japanese beachheads, in what later became known as the Buna – Gona Savaşı.[73] After some of the costliest fighting of the war for the Australians, Gona was recaptured on 9 December 1942, and Buna on 3 January 1943. The Japanese began to abandon Sanananda on 13 January following an unsuccessful Australian assault the day before, while mopping up operations were completed on 22 January.[46]
Northern Papua, July 1942 – April 1943
At the same time elements of the PIB and 39th Battalion had been withdrawing along the Kokoda track, other members of the PIB had been cut-off in the Ambasi–Ioma area. One platoon attempted to escape south to Port Moresby but was dispersed or killed, including Smith who was executed by the Japanese after being captured.[74] B Company, PIB had also been isolated when the Japanese landed in the Buna–Gona area in July, and had been ordered to maintain contact with the Japanese and send reports of their activities as they continued to patrol the Waria–Kumusi River region. In September Watson ordered the detachment in the Kumusi area to concentrate around Garaina–Morobe–Mambare from where they would be reinforced.[75] Moving via a route which avoided the Japanese, C Company and Battalion Headquarters transited Yule Island on 23 September, and after departing Kairuku, crossed the Owen Stanley Range to Garaina, moving then to Popoi on the Waria River, with some men continuing to Ioma. They joined B Company in October and were tasked with contacting the local people to maintain order following the departure of the civil administration, and with rescuing downed Allied airmen. Numbering just 150 men, the PIB attacked Japanese parties retreating to the north coast in November after their defeat at Oivi–Gorari. In January 1943, they intercepted Japanese forces north of Buna and, the following month, assisted in the destruction of Japanese remnants in Papua—killing 200 and capturing three prisoners.[76]
By March 1943 the area between the Kumusi and Waria Rivers had largely been cleared of Japanese forces, with the only significant fighting being an ambush of 14 Japanese at Mogado near the mouth of the Kumusi. Coming under the command of the US 41st Division that month, the PIB advanced with the Americans.[77] After reaching Morobe, they were ordered to return to Bisiatabu, near Port Moresby, for rest, reorganisation and further training, arriving there on 24 April. At this time elements of the battalion had been in action since July 1942; many had been among the first parties over the Owen Stanley Range in June, while the remainder had been in the group that had come forward in September. Due to the harsh conditions prevailing in wartime New Guinea this was a long time to be in action and the battalion was considered to be in need of a break.[78] Although never numbering more than 300 men, the PIB was believed to have killed at least as many Japanese, losing 15 men killed and 35 wounded during the seven months of the Papuan campaign.[79][Not 8] After the battalion returned to Port Moresby in early 1943 the administrative requirements of the unit changed, and the headquarters was subsequently stationed at Bisiatabu, with the rifle companies in the future operating independently under different Australian or US divisions.[80]
The respite was short, as following the recapture of Buna and Sanananda, the Allies planned to move on Lae as part of a series of counter-offensive actions.[81] The PIB was tasked to assist and was reinforced in preparation for these operations, with its strength increased to include a battalion headquarters, headquarter company—including a signals and a pioneer platoon—and three rifle companies. As a result, additional Australian and native personnel were required, and a depot company was added to the establishment to supply trained replacements.[82] Depot Company included native recruits in training, recovering wounded native soldiers awaiting re-posting as reinforcements, and native soldiers employed on guard duties and camp construction.[83] A period of training followed as the new native recruits were taught weapons handling, while the Australians learnt the language of the Papuans and New Guineans under their command, as well as native bush craft.[82] On 1 May 1943, Battalion Headquarters and the Training Depot occupied a camp at Bisiatabu.[84] A Company, PIB under the command of Captain Ernest Hitchcock was the first company to return to action. Departing on 30 May 1943, it came under the command of the US 41st Division for operations at Nassau Körfezi. B Company, PIB under Captain John Chalk left Bisiatabu on 18 June 1943, moving to Wau to be attached to the Australian 7th Division for operations in the Markham ve Ramu Valleys. C Company, PIB under Captain Anthony Leutchford departed on 27 August, moving to Dobuduru to be attached to the Australian 9. Lig for the landing at Lae.[82]
Salamaua, June – September 1943
Over the period 30 June to 4 July 1943, the US 162nd Regimental Combat Team made an unopposed landing at Nassau Bay and established a beachhead there as part of Cartwheel Operasyonu.[81] Australian support included a platoon from D Company, 2/6 Tabur to act as beach party to deploy lights at the landing zone, and a PIB company to hold the Japanese garrison in place at Cape Dinga on the southern flank.[85] Prior to the landing, on the evening of 28 June A Company, PIB under the command of Hitchcock had moved from Buso to Cape Roon by canoe, from where the Japanese positions at Cape Dinga could be observed. Numbering five Australian officers, 18 Papuan and Australian NCOs, and 119 Papuan soldiers in three platoons, the company prepared to attack the Japanese garrison which was estimated at 300 men from III/102nd Battalion. Following several reconnaissance patrols, Hitchcock finalised plans for the assault. On the evening of 30 June they formed up in a creek just south of Cape Dinga. 5 Platoon under Lieutenant Charles Bishop was tasked with securing the heights, while 4 Platoon under Sergeant Bob MacIlwain would attack the two Bassis villages and capture the Japanese telescope located there.[86] On 1 July a patrol moving along the beach to Nassau Bay killed three Japanese in foxholes.[87] Bishop moved up the ridgeline but met heavy resistance, and the platoon was eventually forced to withdraw. Meanwhile, moving along the beach MacIlwain found one of the villages deserted and the other defended by a strong bunker position, which was then set on fire. The bodies of 26 Japanese were later recovered. With the position captured, Hitchcock moved north to Tabali Creek.[86][88]
After making contact with American forces, the Papuans continued attacking the Japanese on the northern coast of Cape Dinga, while blocking any attempt to escape inland.[89] The Japanese at Nassau Bay subsequently withdrew, affording the Allied forces a supply point for the subsequent attack against Salamaua, while heavy artillery landed at Nassau Bay was able to shell the area in preparation. The US 3/162nd Battalion landed at Nassau Bay on 6 July.[90] The PIB advanced along the coast ahead of the US 162nd Infantry Regiment and reached Lake Salus on 9 July before pushing on to Tambu Bay as they followed up the withdrawing Japanese.[91] Hitchcock's men were the first to make contact with the Japanese at Tambu Bay and by 14 July they had been able to confirm that Tambu Bay and Dot Inlet were occupied by the Japanese who had fortified the area. A two-man reconnaissance team scouted to the mouth of the lagoon, 3 kilometres (1.9 mi) south of Tambu Bay, and located a Japanese observation post on the northern side, while approximately 200 Japanese soldiers were seen to be dug-in at Boisi in anticipation of an Allied landing. The scouting was later confirmed to be highly accurate.[90] The American advance on Tambu Bay commenced on 18 July, with two companies from the US 3/162nd Battalion moving north along the inland track, and another company moving along the coast; each using guides from the PIB. On 20 July a PIB platoon attacked a Japanese outpost south of Boisi which was holding up the advance of K Company, killing four and allowing the Americans to continue forward.[92] The same day A Company, PIB received reinforcements, including one officer and six NCOs, all European, who arrived from Bisiatabu.[93]
With Tambu Bay occupied, the US 2/162nd Battalion began landing there the same evening. Yet with a key ridgeline known as Roosevelt Ridge remaining in Japanese hands the area was not secure. A PIB platoon was sent up the western side on 22 July, while two US companies unsuccessfully attacked from the east, with another attempt later in the day also failing before they were pushed off the ridge two days later.[92][94] During fighting on 26 July, A Company, PIB suffered its first fatality, with the death of an Australian corporal attached to I Company on Mount Tambu.[93][95] From 22 to 24 July two PIB platoons held defensive positions near Boisi, while several sections guarded the track towards Mount Tambu to cut off any Japanese trying to withdraw.[96] Further attempts by the Americans to capture the high ground in late July and early August also failed, despite the landing of artillery.[97] Over 1–9 August the PIB conducted patrols, both independently and attached to the Americans.[96] During this time Hitchcock had to be evacuated to hospital following an attack on Allied artillery positions by Japanese aircraft.[93] On 5 August, 5 Platoon was attacked by Japanese on the ridge above Boisi, losing one killed. Later that night a further two men were wounded on Mount Tambu while attached to K Company.[96] On 9 August a patrol from 4 Platoon clashed with a Japanese pillbox which they assaulted with grenades, losing one Papuan wounded. The Australian 15th and 42nd Battalions were then committed to the fighting, and the PIB provided guides as they moved into position.[93] Further attempts by the Americans finally succeeded in capturing Roosevelt Ridge, after establishing a lodgement at the western end and reducing the remaining defences with artillery between 12–14 August.[98]
On 12 August a company-sized Japanese force from I/162nd Battalion was detected after leaving Salamaua and was believed to be moving against the Allied rear positions and artillery located around Tambu Bay. The raiding party were followed by an American force which succeeded in dispersing a small group south-east of Mount Tambu on the 13th. With the pursuit continuing, a PIB platoon was tasked with guarding a US artillery battery on the southern side of Tambu Bay on 12 August, and was reinforced by another platoon two days later. Clashes between patrolling Australian and US infantry and the Japanese continued over the following days and by 16 August the raiders had split into three groups. Attacking the Australian and US gunlines that morning the Japanese were repulsed, while the guns remained intact.[99][100] That morning a Papuan platoon also clashed with the Japanese, killing three and a native guide just after midday, before establishing an ambush above the 1700 feature during the afternoon. A patrol encountered a large Japanese force on a narrow spur and the platoon was forced to withdraw before being surrounded, moving down the track towards Cochrane Beach where they were resupplied. They reoccupied the feature that night and dug-in. The following day they clashed with more Japanese patrols, ambushing them and forcing their withdrawal under the cover of artillery, which then compelled the Papuans to retire again. Hitchcock ordered the patrols continue, and the Papuans were sent back up the ridgeline, patrolling until relieved by US forces.[101] With the raid having failed, the surviving Japanese attempted to withdraw to Mount Tambu but were pursued by Australian and US patrols, with the majority of the force being destroyed. Skirmishes occurred west of the 1700 feature, with the Papuans dispersing a force of approximately 20 Japanese on 18 August.[102]
By 20 August A Company, PIB occupied a line from Scout Ridge north of Boisi to the 1700 feature behind Salus, and the ridgeline just north of Salus Lakes, in an area which had been mostly cleared of the Japanese. They then began to move towards Boisi. During this time other members of the company were detached as scouts working with the Americans. After concentrating at Boisi, they rested for several days.[103] Now under divisional control, the Papuans prepared to move towards Salamaua with orders to conduct reconnaissance and to cut off any Japanese withdrawing through the area.[104] Setting out on 28 August a Papuan patrol under Lieutenant Dick Gore observed a Japanese force in Lokanu before moving inland to bypass them. Leaving some men at Charlie Hill, the remainder of the company continued south the next day before taking up positions along a creek east of Mount Tambu. The Papuans were then tasked with finding a Japanese artillery piece located on the ridgeline below Nuknuk which controlled the approaches from Komiatum towards Salamaua. The gun had been mounted on a section of railway track and was being concealed in a tunnel cut into the side of the ridge, preventing it from being targeted by Allied aircraft and counter-battery fire. A patrol from 4 Platoon was able to determine its approximate position after questioning the local people, and a small group of three Papuans under Lance Corporal Bengari then infiltrated Japanese lines to confirm its location.[105] After pin-pointing the gun they returned to Komiatum. Bengari then guided an Australian company-sized patrol to the position and destroyed the gun and killed its crew using grenades, while the Australians fought the Japanese inside the tunnel. A heavy engagement developed as the Japanese attempted to reinforce the position, with the fighting continuing until dusk before they were forced to retreat. The Australians also withdrew, moving back to Bobdubi.[106][107]
A number of Papuan sections were still detached, operating with the Australian and US battalions in the area. Meanwhile, the remainder of the Company continued to patrol over 6–7 September without contact.[108] Finally, by 8 September the Japanese began to withdraw from Salamaua.[109] On 11 September the elements from A Company, PIB which had remained on Charlie Hill, cautiously moved into Salamaua which they found largely destroyed, with decaying food, rubbish and Japanese corpses strewn among the ruins. They subsequently withdrew. The Papuans were then tasked with clearing the beach from Kela Point, Malolo Mission, Buakap and Busama. Patrolling to the ridge overlooking the mission no Japanese were observed. However, on 13 September when the Papuans entered Malolo they were engaged by a Japanese machine-gun from long range, which was then destroyed by 1 Platoon. Company Headquarters was then set up in the village, and from there they patrolled along the beach through Busama, towards the swamps around Labu. Sweeping through the area, the main Japanese force was found to have withdrawn, while the Papuans moved as far as the mouth of the Markham River and then through the swamps to the foothills.[110] Following the return of the Company's various detachments it concentrated at Malolo, before moving to a new camp at Boisi for a period of rest.[111] By 27 September A Company had returned to Tambu Bay in preparation to leave for Lae. Losses during the Salamaua campaign amounted to two killed and 14 wounded.[110]
Markham Valley–Lae, June – October 1943
Australian units had been operating in the Markham Valley since the Japanese landing at Lae in March 1942. Initially these forces had been limited to the NGVR; however, they were later replaced by AIF units. 57th/60th Battalion, 15 Tugay took over responsibility for the area and the road through the Watut Valley to Bulolo and Wau in June 1943. B Company, PIB under the command of Captain John Chalk, was subsequently attached to the battalion for scouting and patrolling, leaving Port Moresby on 26 June and flying to Wau, before moving to Bulolo and then down the track to the Wampit River where they established a base on 1 July. Allocated a large area of operations, B Company was tasked with patrolling the southern bank of the Markham River, from Wanton River to New Labu Island. Standing patrols and platoon outposts were established, with 6 Platoon at Oomsis and 8 Platoon at Bob's Camp, while additional detachments operated out of Ngaragooma and Deep Creek.[112] Meanwhile, 7 Platoon was detached to the 57th/60th Battalion at Tsili Tsili.[113] The first contact occurred on 9 July, when a party from 6 Platoon was fired on near Deep Creek. As the patrols continued the Papuans developed a detailed map of the area and Japanese movements, while continuing to observe Japanese dispositions on the northern bank. A 50-man patrol moved through to the Buang River in mid-July. On 24 July a Papuan soldier was killed by a bomb dropped by Japanese aircraft as they flew over the New Mari villages en route to Lae. The following day B Company suffered further losses after a patrol led by Sergeant Owen Reynolds was ambushed at close range near Deep Creek. A Papuan corporal took command after Reynolds was mortally wounded, withdrawing the patrol under heavy fire. On 1 August a party of engineers was escorted by 8 Platoon to the Markham River as part of a reconnaissance to identify possible crossing points for an assault on Nadzab.[112]
On 9 August, a patrol from 8 Platoon to New Labu Island was attacked by a group of Japanese and hostile villagers, with two Papuans and a number of Japanese killed.[114] Although costly, the patrol confirmed the Japanese were unaware of Allied preparations to attack Nadzab. B Company continued patrolling the southern bank of the Markham River, reporting on troop movements and dispositions. On 24 August they came under command of New Guinea Force and were ordered to prepare for the crossing of the Markham and assault on Nadzab. The PIB subsequently manned staging camps and guard posts along the river, which were in place by 27 August.[115] In early September they patrolled between Mount Ngaroneno and the mouth of the Watut Nehri to ensure it was clear of Japanese forces. Meanwhile, a small party crossed the Markham in a rubber dingy, scouting towards the proposed drop zone.[115] On 4 September, a force, including the 2/2nd Pioneer Battalion, and engineers from 2/6th Field Company married up with B Company, PIB, at Kirkland's Crossing after moving overland from Tsili Tsili, and began to prepare the airfield.[116][117] With the campaign reaching a crucial point, a combined landing at Nadzab by US paratroopers and Australian artillery took place on 5 September.[115] During the landing the Papuans picqueted the south bank of the Markham, and with the pioneers successfully establishing a beachhead they then crossed with the engineers.[118] As the airdrop proceeded, the Papuans were tasked with assisting to secure the upper Markham Valley against any possible Japanese move to reinforce Lae from Madang.[119] With Nadzab captured preparations began to allow the Australian 7th Division to fly in so as to complete the encirclement of Lae, following landings to its east by the 9th Division which had begun the day before.[120]

Moving forward to the Erap River, B Company, PIB set up camp and began patrolling the western approaches to Nadzab.[115] During a patrol with US infantry on 13 September, one Australian and two Americans were killed when they were ambushed. A number of patrols subsequently clashed with the Japanese, with a patrol killing two Japanese after crossing the flooded Busu Nehri near Boana, while another on 16 September killed five Japanese.[115] 8 Platoon was then detached to the 2/14th Battalion at Camp Diddy and moved towards Boana with the aim of cutting off any Japanese withdrawing from Lae. 6 Platoon, which had originally been left to patrol the Nadzab–Lae area, was then recalled and moved up the Markham River, occupying Sasiang.[121] 19 Eylül'de 2/6th Independent Company prepared to attack Kaiapit, and a section of Papuans from 7 Platoon accompanied them to contact the local people and start to repair the airstrip once it had been secured for use in an emergency. The commandos assaulted Kaiapit late that afternoon, seizing an outpost following a number of bayonet charges, before digging-in that evening. The rest of B Company, PIB had remained at Sangan but was later ordered forward to a point 1.6 kilometres (1 mi) from Kaipit with the reserve ammunition and to cover the wounded. In position just after dawn the next morning they clashed with a group of Japanese, killing five of them. During the day the Japanese counter-attacked the Australians but were driven out of Kaiapit with very heavy losses.[122][123][124] Japanese casualties included 214 killed and a further 50 probably killed, while the Australians lost 14 killed and 23 wounded.[125]
B Company, PIB moved forward to Kaiapit on 21 September to join the commandos. With the Japanese remaining in the area its two platoons occupied a number of positions astride the track from Kaiapit to the Mission and on Mission Hill, while transport aircraft began to land on the hastily cleared airstrip with reinforcements. In the late afternoon a Papuan platoon attacked a Japanese Tayfa. The survivors then attempted to withdraw, only to clash with another PIB platoon and were killed, with one Papuan wounded. That evening the Japanese counter-attacked the Papuan positions around the Mission, only to be driven back after heavy fighting which resulted in a number of civilian casualties after the village had been accidentally hit by stray small-arms fire. By first light on 22 September the Japanese had withdrawn from Kaiapit.[126] Elsewhere, 8 Platoon—which was still detached—had been involved with a number of other units in the pursuit of a large Japanese force of approximately 300 retreating from Lae, but had been unable to make contact before the Australian force was withdrawn to be retasked.[121][127] With Kaiapit now secured the Papuans were given the task of patrolling ahead of the pursuing Australian force as they followed the Japanese into the Ramu Valley.[126]

While operations were continuing in the Markham Valley to the north-west, C Company, PIB under the command of Leutchford had been operating with the 9th Division following its Lae'ye iniş.[128][129] The Papuans carried out scouting and reconnaissance patrols on the coastal plain to the east of the town and in the mountain ranges to the north, and later harassed retreating Japanese troops attempting to move through the Saruwaged Mountains, operating from Gawan and Musom in the south, Boana in the west, and Mount Salawaket in the north-east.[130] Landing on Red Beach on 5 September, after leaving 10 Platoon to dig-in on the beach, the Papuan company moved west towards Lae. That morning Japanese bombers had attacked the beach, causing a large number of allied casualties. One of the Papuans from 10 Platoon subsequently died of his wounds. Meanwhile, the remainder of C Company married-up with the 2/4th Independent Company and moved to the Singaua Plantation.[130] 9 Platoon then moved to the Busu River crossing, being attached to the 24 Tugay for the advance along the coastal route.[129] At the same time 10 and 11 Platoons advanced in front of the 26th Brigade as it moved up the Burep River via the inland route. By 10 September the platoons were between the Busu and Burep Rivers, while one was below Musom village downstream. Over the next few days reconnaissance patrols clashed with the Japanese, killing a number of them.[130] With the 7th and 9th Divisions converging on Lae the town fell to the Australians on 16 September.[120] As Japanese forces attempted to escape a number were killed by PIB patrols during a series of clashes and ambushes up to 19 September.[130]
Although C Company was earmarked for the upcoming landing at Finschhafen, the need to cut-off the Japanese retreat meant 11 Platoon would remain behind at Gawan, north of Lae, while the remainder of the company redeployed. 11 Platoon was then tasked with patrolling to Mililunga and along the Boana track until relieved by A Company in late October.[130] By 28 September A Company, PIB had completed their redeployment from Tambu Bay to Lae, establishing a headquarters at Old Yanga village. 1 Platoon moved north along the Busu to take over from 11 Platoon, C Company, while 5 Platoon was still operating around Labu Swamp. 4 Platoon patrolled to Gwabadik village and from there to Musom, then north towards Kemen.[131] 3 Platoon moved to Sugarloaf to be attached to the 15 Tabur. Over the following days 4 and 5 Platoon had contacts with small groups of Japanese fleeing Lae.[132] On the morning of 13 October a 4 Platoon patrol attacked a group of hungry Japanese in Kemen, killing eight soldiers and capturing two officers.[131] On 15 October, 5 Platoon located Japanese equipment and other evidence of a group moving towards Markham Point; making contact the following day they killed five.[133] On 17 October two sections from A Company were detached to the 29th/46th Battalion during mopping up operations between Mongi River and Finschhafen. While patrolling the area villagers informed them the Japanese were withdrawing towards Sattelberg. Patrols also continued in the lower Markham, and north of Lae another difficult patrol was conducted over a 10-day period from Bungalumba to Mount Saruwaket via a disused and overgrown track. They subsequently detected a group of Japanese that had crossed the range towards Iloko and Sio.[131] By the end of November A Company, minus the sections on the Mongi River, was back at Old Yanga where they prepared to move to Finschhafen. Meanwhile, there were also 100 local recruits at Old Yanga, and this later became PIB Sub-Depot Lae.[131]
Ramu Valley, October 1943 – January 1945
While the Lae campaign continued, the 7th Division pursued the Japanese into the Ramu Valley as they retreated following the fighting at Kaiapit.[131] The main Japanese force withdrew via a route to the north from Dumpu, over the Finisterres Ranges at Kankiryo Saddle, in the direction of Madang. Meanwhile, a small force had withdrawn directly down the Ramu Valley. B Company, PIB under command of Chalk was subsequently attached to the 21st Brigade which was tasked with harassing this group. During a number of patrols in September extended operations ranged as far north as the Annenberg villages before being involved in a minor skirmish with the Japanese at Naruapan. Unopposed, B Company continued up the Markham Valley, linking up with the 2/6th Independent Company at Marawasa. At Haus Sak Sak on the southern side of the Upper Ramu they set up camp, with the Papuans patrolling the area to the north. Company Headquarters then moved to Kaigulan on the north bank of the Ramu. On 3 October a patrol from 6 Platoon ran into a small group of Japanese at Bopi, capturing a prisoner. The headquarters then moved to Dumpu airstrip. On 13 October a platoon patrol of the foothills behind Kumbrarum located a Japanese gun that had been shelling the 31st Battalion, and it was later destroyed by an airstrike. 7 Platoon then patrolled up the bank of the Faria River to Guy's Post on the eastern side of Shaggy Ridge, while a section patrol continued to Mount Prothero, crossing the range at the top of the Mindjim Nehri, moving through Japanese territory for seven days. On 22 October, 6 Platoon departed on seven day patrol of the headwaters of the Mene River. On their return a section with fifty carriers attached patrolled deep into the ranges near Kankiryo Ridge over 13 days, returning without making contact with the Japanese.[134][135] By late October the 7th Division and its attachments, including the Papuans, had succeeded in driving the Japanese from the Ramu Valley and into the Finisterres; however, supply problems prevented further advances.[136]
During this time the remainder of the company had been resting at Kumbarum, awaiting the return of the other patrols. On 6 November they moved forward into the Yogi River region, 10 kilometres (6 mi) to the west. 6 and 7 Platoons then crossed the Ramu, patrolling the area around Mount Otto on the edge of the Central Highlands.[137] The 7th Division had been tasked with preventing Japanese penetration of the Ramu and Markham Valleys using screening patrols during October and November.[138] On 9 November B Company, PIB was ordered to relieve the 2/6th Independent Company around Kesawai, and it subsequently crossed the Evapia River and commenced patrols in the area around the 5800 feature. One patrol clashed with a Japanese patrol of around 20 men, coming under heavy fire before repelling them. The company then took up defensive positions to guard the area from the Kesawai villages to the northern ridge of the 5800 feature. Continuing to patrol the area, information on Japanese activity was gained from the villages to the north, while a number of minor clashes with small Japanese groups occurred, resulting in one Papuan being wounded. On 26 November a three-man standing patrol on the perimeter near Kesawai killed one Japanese soldier and wounded another. On 30 November a platoon crossed the Ramu, patrolling into Waimeriba village.[139]
From 1 December 1943, B Company, PIB came under command of the 25th Brigade and occupied positions on the banks of Evapia Nehri prior to the arrival of the 7th Division.[139] The Papuans sent out a clearing patrol north-east of Kesawai No. 1 which reported the area clear, while another patrol from the 5800 feature observed a large Japanese force to the north of the Taipa villages but avoided contact. Later a section from 7 Platoon killed a Japanese officer and wounded a soldier in an ambush.[140] Meanwhile, there had been other signs of Japanese movement detected in the area, indicating the possibility of a major action against Allied forces in the Ramu Valley and Finisterres. Japanese forces were more active in the west, while the Australian positions in this area were dangerously dispersed, with a large distance between the Papuans around the 5800 feature and the 2/6th Independent Company to their left on the Solu River, with this gap considered to be vulnerable to infiltration.[141] By 7 December B Company, PIB was located on a position astride the main track running north-south on the 5800 feature, with 7 Platoon under the command of Lieutenant Ed Bishop on the forward perimeter, on a spur to the north of the feature.[139]
After midnight on 7/8 December the booby traps in front of 7 Platoon exploded as a large Japanese force estimated at approximately two companies assaulted the forward Papuan section, guided by hostile natives. The Papuans stood-to defend their position, and succeeded in holding the attackers at bay for the next two hours for the loss of two men killed, while a runner broke through and alerted the platoon commander. The Japanese then attacked the platoon main defensive position from two sides.[142] At 03:00 Chalk attempted to contact 7 Platoon by field telephone, but was unsuccessful. The fighting continued until around 0900, by which time 7 Platoon had run out of ammunition. Surrounded and with the telephone wires back to the company position cut there was no chance of resupply. The platoon was forced to withdraw with Bishop leading a breakout, during which heavy casualties were inflicted on the Japanese. However, with the men forced to move individually many became separated, while several were injured by their own booby-traps, and others were wounded by Japanese fire as they attempted to move back to Australian lines. After occupying the position, the Japanese fired a number of flares which signalled a line of carriers to bring up reinforcements and supplies.[139][143] At 11:00 a Papuan lance corporal made it back to the company position and reported the situation, while later a sergeant and 10 native soldiers also returned. However, with most of 7 Platoon till missing, Chalk was ordered to withdraw B Company, PIB to the Evapia Nehri.[144]
Part of a Japanese attempt to push the Australians off the hills and into the Ramu Valley, the attack was followed by moves against positions held by the 2/6th Independent Company on 8 December which forced a number to be withdrawn, while other elements were cut-off. However, in the days that followed the Australians regrouped, while reinforcements moved forward as the Japanese dug-in. On 9 December the Japanese held positions above Kesawai were heavily attacked by Allied aircraft.[145] Meanwhile, many of the PIB survivors had started to make their way back; even still, by that evening of those that had been on the 5800 feature, Bishop, four Australian NCOs, and 12 Papuans remained missing. Over next few days a number of others made it through to the forward positions of the 2/25th Battalion around Kesawai, and by 11 December Bishop, two NCOs and one wounded Papuan had been located, accounting for the last of the missing. Total PIB casualties during the fighting had been three killed and two wounded.[143][146] On 16 December the company moved again, crossing the Ramu River to establish a patrol base to cover the Kobon–Koropa–Soly River area. From this position the company continued to patrol until 3 January 1944. Following six months of active service it was withdrawn, returning to Bisiatabu near Port Moresby for rest. After leave, a period of training and regrouping followed.[147] Meanwhile, the 7th Division cleared Shaggy Ridge on 23 January 1944.[81]
In June 1944 B Company, PIB—still under the command of Chalk—returned to Dumpu, relieving the carrier company of the Australian 11. Lig. From mid August to 9 November patrols of the area were conducted from Dumpu, while others were also conducted from Annenberg towards the Kreram River to west, as well as downstream to Schillings Plantation.[148] On 9 November a patrol under Lieutenant Thomas Bruce departed by canoe to investigate an island downstream near Anjetti. As they attempted to land they were engaged by a group of Japanese. Bruce was killed in the opening volley, and although the patrol managed to reach the safety of the river bank it was later discovered that six Papuans were also missing. Despite efforts to find them, their bodies were never recovered. Over the days that followed reinforcements were flown to Annenberg, while aircraft flew reconnaissance missions over Anjetti but were unable to locate the Japanese force. In late November the company, minus 6 Platoon, was ordered to return to Bisiatabu near Port Moresby. Meanwhile, 6 Platoon remained at Annenberg, continuing routine patrolling until early January 1945 when it was also withdrawn.[149]
Finschhafen, September 1943 – January 1944
While B Company was fighting in the Markham and Ramu Valley campaign, A and C Companies were involved in the capture of Finschafen and Sattelberg, before pursuing the Japanese along the northern coastline of the Huon Peninsula towards Saidor between September 1943 and January 1944.[150] With the fall of Lae occurring more quickly than expected the 20th Brigade of the 9th Division had been retasked to capture Finschhafen in the next in the series of amphibious operations.[151] From there they would begin the advance towards Sio, further around the coast on the northern side of the Huon Peninsula.[152][153] C Company, PIB under Leutchford (minus 11 Platoon which remained at Lae until early November) was detailed to be part of the landing at Scarlet Plajı.[150] They would be tasked with patrolling and helping ANGAU recruit local carriers.[151] Bununla birlikte, Japonların gücü Müttefik komutanlığı tarafından önemli ölçüde hafife alınmıştı ve Scarlet Beach bölgesinde 5.000'den fazla askerle güçlü bir şekilde savunuldu. Deniz bombardımanının ardından çıkarma, 22 Eylül sabahı 05:00 civarında şafaktan önce başladı. Karanlık, güçlü bir akıntı ve hatalı haritalar nedeniyle, bir seyir hatası, birinci ve ikinci dalgaların yanlışlıkla yere inmesine neden oldu. Siki Koyu, güneyde yaklaşık 900 metre (1.000 yarda) ve sonuç olarak ana Japon savunmalarından kaçınıyor. Üçüncü dalga, Scarlet Plajı'na doğru bir şekilde indi ve kendini çok meşgul buldu.[150][151][154]

10 Takım, Siki Koyu'nun kuzey ucuna, Siki'nin ikinci dalgasıyla indi. 2/13. ve 2 / 17. Taburlar ve karşı çıkılmadı. Hızlıca sahilden palmiye ağaçlarına doğru ilerleyerek, sahili savunan Japon mevzilerine saldırmak için güneyde Katika'ya döndüler. Daha sonra hem Japon hem de Avustralya birlikleri tarafından ateş altına alındı ve birkaç kişiyi yaraladılar. 9 Takım ve Şirket Karargahı daha sonra üçüncü dalgayı içeren 2 / 15'inci Tabur Scarlet Beach'te. Son ana kadar ateşini tutan Japonlar tarafından şiddetle direnen Avustralya kuvveti, ağır makineli tüfek ateşi altına indi. Papualıları taşıyan uçak vuruldu, iniş mekanizmasına zarar verdi ve rampayı yarı yarıya açarak onları yan taraftan derin suya inmeye zorladı. İlk olarak, Leutchford neredeyse anında vuruldu. Ağır yaralandı, kısa süre sonra bayıldı. Hala yoğun bir şekilde meşgul, operasyon için şirkete bağlı bir Papua polis çavuşu tarafından suda desteklendi ve daha sonra yakındaki bir Avustralyalı askerin yardımıyla karaya sürüklendi. Avustralyalılar ve Papualılar Japon savunucuları yarım saat içinde geri iterken, Leutchford yaralarından öldüğünde, sahilde ağır savaş devam etti.[155] Bu arada, bir bölüm ayrılmış olmasına ve birkaç sığınağı geçmeye zorlanmasına rağmen, 9 Müfreze Japon siperlerini aştı ve kazıldı. Bu dönemde çıkan çatışmada çok sayıda üye yaralandı.[156] Yanlış yere inmenin neden olduğu ilk karışıklığa rağmen, Avustralyalılar sonunda dağınık birliklerin kontrolünü yeniden ele geçirdiler ve sahilde birbirine karışan farklı birimleri çözdüler. Gün ışığında, sahili sağlamlaştırmaya başlamadan önce, sahili ve orman kenarını korumayı, arkasındaki sabit Japon savunmasını silip, ardından onları geçmeyi başardılar.[157]
Şafakta C Bölüğü, PIB yeniden toplanmak için sahile geri döndü ve takımlar hedeflerine doğru yola çıkmaya hazırlanırken Teğmen Colin Rice geçici komuta aldı.[156] 10 Müfreze, kuzeydeki plajı boşaltılmış olduğu tespit edilen Bonga'ya doğru temizlerken, 9 Takım güneye hareket ederek Tareko yönünde Sattelberg Yolu boyunca bir keşif gerçekleştirdi. Ertesi sabah yola çıktılar. Jivevaneng, ilerleyen Avustralyalıların önünde araştırma yapıyor.[158] Görev istasyonuna ulaşan 9 Takım, onu terk edilmiş halde buldu ve daha sonra işgal edildi.[159] Hakim konumu ve sağladığı gözlem nedeniyle taktiksel öneme sahip bir alan olan D Şirketi, 2 / 17'nci Tabur misyonu geçti ve 25 Eylül'de direnişle karşılaşmadan önce 5 kilometre (3.1 mil) batıdaydı. Güçlü bir Japon kuvveti ile karşı karşıya kalan Avustralyalılar, Jivevaneng'e geri dönmek zorunda kaldılar, ancak sonraki günlerde pozisyonlarına yapılan altı güçlü saldırıyı püskürttüler ve ardından, Kaptan Eric Grant komutasındaki 2/43. Tabur'dan iki müfreze tarafından kurtarıldı.[160] 30 Eylül'de Grant'in güçsüz birliği ve 9 Takım'dan Papualılar kuşatıldı ve kesildi, ancak önümüzdeki dört gün içinde bir dizi saldırıyı durdurabildiler. Bir PIB çavuşu ve ana kuvvetlerden bir grup izci önünde iki Avustralyalı şirketin kırma girişimi, nihayet Japon hatları üzerinden gönderilen iki Papuan tarafından pozisyona yönlendirildi. 4 Ekim'de, bir yardım gücünün nihayet yoluna girmesinden sadece saatler önce, etrafı saran kuvveti yaralılarını taşımak üzere yönlendirdiler.[159][161][162] Bu arada, Finschhafen iki gün önce düşmüştü.[81] Bu süre zarfında 10 Takım, 2/3 Pioneer Taburu arasındaki yaklaşımı koruyan Song Nehri ve North Hill.[159]
Leutchford'un yerine geçmek üzere, A Company'den Dick Gore kaptanlığa terfi etti ve C Company'nin komutasını devraldı.[111] PIB devriyeleri, takımların Japon mevzilerini araştırdığı ve Avustralya taburlarına rehberlik ettiği bir dizi alanda faaliyet gösterdi. Papualılara olan talebin artmasıyla, bölümler dağıldı ve komuta ve kontrol zorlaştı. 12 Ekim'de C Bölüğü'nde PIB, 9. Tümen'in doğrudan komutası altına girdi ve arazi hakkında bilgi toplamak ve Bonga-Warea'da derin devriye gezmekle görevlendirildi. Wareo –Sattelberg – Mararuo alanları.[163] Japonların 16–17 Ekim'de Jivevaneng ve Scarlet Plajı'na karşı saldırısı başarısızlıkla sonuçlandı ve Sattelberg ve Wareo'ya doğru dağlara geri itildiler. 2 / 17'nci Tabur önünde nöbet pozisyonunda bulunan 10 Takım'dan bir bölüm, 16'ncı sabahı ağır ateş altında gelmesine rağmen kayıpsız geri çekilebildiği halde çatışmaya dahil oldu. Japonlar daha sonra Müttefik kuvvetlerini yerinden etme girişimiyle takviye kuvvetlerini harekete geçirerek Scarlet Plajı ile Siki Creek arasındaki alanı tehdit etti. 18 Ekim'de bir Papua devriyesi Song Nehri'nde Japonları bildirdi. Bununla birlikte, yoğun çatışmalardan sonra Japon karşı saldırısı nihayet buharını yitirdi. Bu arada, 2 / 17'nci Tabur Jivevaneng'de tutunuyordu ama erzak azaldı ve iletişim hatları kesilmişti. 19 Ekim'de bir PIB devriyesi, malzeme ile Tareko'dan Jivevaneng'e ülke genelinde taşınmayı başardı.[163]
Lae etrafındaki operasyonlarının tamamlanmasının ardından, 11 Takım, C Bölüğünün geri kalanına yeniden katıldı. 23 Ekim'de ağır bir şekilde görevlendirilen şirkete hem 20. Tugayı hem de 22. Taburu ve 24. ve 26. Tugayları destekleme emri verildi.[163] 2/43.Tabura bağlı PIB devriyeleri stratejik açıdan önemli Bonga'yı yeniden tanımladılar.Gusika parkurun yanı sıra Pino Hill ve ona hakim olan Exchange ve Oriental özellikleri. Şiddetle itiraz edilen, bölgenin kontrolü savaş sırasında birkaç kez el değiştirdi ve devriyeler sonraki birkaç gün boyunca Japon hareketlerini gözlemledi. Japon karşı taarruzunun yenilgisinin ardından Avustralyalılara bölgeyi temizlemeleri ve kuzeydeki kıyı şeridini Sio'ya kadar emniyete almaları emredildi. Japonlar daha sonra devriye geri çekilmeden önce bölgeyi bir tahliye ve tedarik yolu olarak kullanarak gözlemlendi.[164] PIB ve 2 / 43rd Tabur'un unsurları daha sonra bölgeyi geri almak için Pino Hill'i araştırdı. Bu devriyeler Japon takviye kuvvetlerinin mavna ile indiğini tespit ederek, Avustralyalıları Sattelberg çevresindeki yüksek yeri ele geçirmek ve Gusika-Wareo hattına ilerlemek amacıyla saldırılarına devam etmeye teşvik ederken, Japon ikmal hatları saldırıya uğradı. Kasım ayının başlarında, PIB ve 2/43.Tabur devriyeleri Gusik-Wareo yolunda Japon hareketlerini izlerken bir gözlem noktası oluşturuldu. Devriyeler ayrıca kuzeyi araştırarak Bonga ve Pino Tepesi civarında bir dizi Japon birimini tespit etti. Yerel köylüler kılığına girmiş beş kişilik bir PIB devriyesi, 9 ile 11 Kasım tarihleri arasında Bonga'nın kuzeyinde bir gözlem noktası kurdu ve buradan oldukça büyük bir Japon gücü tespit ettiler. Benzer bir dört kişilik devriye daha sonra Wareo yakınlarındaki Japon hatlarına girdi ve iki gün boyunca pozisyonda kaldı.[164] Gözlem noktası da insanlı olmaya devam etti. 20 Kasım'da sahil şeridinde bir devriye, Bonga'nın güneyinde önemli Japon güçleriyle karşılaştı ve geri çekilmek zorunda kaldı.[164]
Kıyı boyunca bir Japon karşı saldırısı 22 Kasım'da başladı, ancak 2/43 Taburundan bir şirket tarafından düzenlendi.[165] bölgeye hakim olan Sattelberg Dağı ise nihayet 25 Kasım'da düştü.[81] Lae'de beklenmedik bir hızla yakalanan önceki operasyonun aksine, Finschhafen, GHQ'nun sadece iki hafta süreceği tahminlerine rağmen iki aydan fazla zaman almıştı.[166] Sonunda Japonlar geri çekilmeye başladı. Yine de Sattelberg'i kaybetmelerine rağmen, Wareo'da ve kuzeyinde yüksek mevkilerde pozisyonlarını korumaya devam ettiler. Avustralyalılar zorlu savaş sırasında Huon Yarımadası boyunca kuzeye ve ardından batıya doğru ilerlerken, Japonlar onları geciktirmek için geri korumalardan ayrıldı.[167] 2/43 Tabur ve PIB'den birleşik devriyeler Japonları aramak için kuzeye hareket ettiler ve 24'ünün öğleden sonra Japon arka koruma gruplarıyla karşılaşmadan önce yüzlerce terk edilmiş siper ve yaklaşık 40 ölü buldu. Daha sonra bir grup Papualı, 24-25 Kasım tarihlerinde 2/43. Tabur'dan Pebu'ya adamlarla birlikte taşıyıcılara eşlik ederek, ikmal hattının güvenliğine yardım etmeye dahil oldu. 25 Kasım günü öğleden sonra, PIB'den bir Avustralyalı arama emri subayı ve bir Papuan askeri, 2/43. Tabur'dan iki Avustralyalı işaretçi ile birlikte, bir Japon makineli tüfek tarafından öldürülürken, geri çekilen Japon. Bu arada, Japonlar Pabu'yu yeniden ele geçirmek için Pino Tepesi'ni yeniden işgal etti, ancak Pino Tepesi'nden gelen piyadelerin kasıtlı saldırısı karşısında terk edilmeye zorlandılar. 2 / 32.Tabur dört tarafından destekleniyor Matilda tankları ve topçudan ağır hazırlık ateşi, 9 Takım, PIB keşif olarak eklendi.[165]
Daha sonra Wareo-Gusika hattına ilerleme başladı, 9 Takım Kuzey Tepesi'ni işgal etmek için ilerledi, 10 Takım ise Song Nehri ve kuzeydeki Fior köyüne sondalar yaparak 26. Tugayı destekledi. Song Nehri, Avustralya'nın ilerleyişinin önündeki ana engeldi ve Japonlar geri çekilmeden önce karşısındaki tek köprüyü yok ederek bir alternatifin bulunmasını gerektiriyordu. 10 Takım daha sonra ağır çatışmalardan sonra 2 Aralık'ta düşen Nongora'yı ele geçirmek için 2 / 15'inci Tabur'u destekledi.[168] Japonlar Wareo'ya doğru tamamen geri çekilirken, C Şirketi PIB, onları kesmekle görevlendirildi. 10 Takım'dan bir bölüm 2/4 Komando Filosu ile çalışırken, 9 Takım Joangeng yakınlarında batıya taciz operasyonları gerçekleştirdi. 6 Aralık'ta 9, Takım Gusika'nın kuzeyinde başarılı bir pusu kurarak altı Japon'u öldürdü.[168] Bununla birlikte, Gore'un adamları üç aydan fazla bir süredir görevdeydi ve sonuç olarak, dinlenmek için Kulungtufu-Hube bölgesine taşınmadan önce C Şirketi'ne A Şirketi PIB tarafından görevden alınması emri verildi.[169] Bu arada, 3 Aralık'ta başlayan Avustralya 4. Tugayı, Gusika'dan kıyıya doğru ilerlemeye başladı.[170] Avustralya'nın açılış aşamasına liderlik ediyor Sio'ya doğru ilerlemek.[171]

Bir Şirket, PIB, 10 Aralık'ta Lae'den deniz yoluyla Finschhafen'e hareket etti. Tunom Nehri'nin ağzında Coconut Plajı'nda bir üs kampı kuran ilk devriyeler 16 Aralık'ta yola çıktı. Song Nehri üzerindeki bir mevkiye iç bölgelere taşınan 3 Müfreze'nin üyeleri, yakındaki bir Avustralya taburundan bir nöbetçinin gece boyunca öldürülmesinin ardından bir grup Japon askerini takip etmeye dahil oldu. Papualılar, ertesi gün Japonları yoğun kunai otları boyunca ateş altında kaldıkları Sowi Nehri'ne doğru takip eden bir Avustralya devriyesine eşlik ettiler. Devriyenin yere gittiği kuvvetin büyüklüğünden emin değilim. Japonları alt etmeye karar verdiler ve gizli bir konumda altı Japondan oluşan bir grubu bulup öldürdüler. Bu arada, 5 Takım'ın unsurları Aimoloa'nın güneyindeki Sanga Nehri'ne ulaştı ve bir başka devriye, 24. Tugay'ın önündeki Lakona'ya doğru kıyıya doğru ilerledi. Bir Şirket, PIB, Masaweng Nehri 22 Aralık'ta Mikos No. 1'de. Geçiş sırasında bir PIB devriyesi, bir uçurumun çıkıntısında kurulmuş bir gözlem noktasına giren bir dizi Japon askerini tespit etti. Onbaşı Tapioli'nin altındaki bir bölüm, konumu gözlemlemek için ilerledi, ancak bir Japon askeri tarafından görüldü. Tapioli hemen Japon askerini öldürdü ve ardından diğer adamları tarafından mağara ağzına saldırdı. Ardından gelen eylemde tüm Japonlar öldürüldü ve cesetleri nehre atıldı.[169] Aralık sonunda 4 Tugay, Tahkimat Noktasını geçti ve 20. Tugay tarafından rahatlatıldı.[172] Ölü, yaralı ve açlık çeken Japonlar, Rai kıyılarına doğru ilerledikçe Avustralyalılar tarafından giderek daha fazla karşılaşılıyordu. 3 Takım daha sonra uzun menzilli bir devriye gezdi ve Japon kuvvetlerinin Zagahemi'ye doğru ilerleyen geri çekilmesiyle ilgili bilgi topladı ve bu sırada Nompua yakınlarındaki bir yolda dört kişiyi şaşırttı ve öldürdü.[169]
Kulungtufu C Şirketi'nde, Gore yönetimindeki PIB devriye gezmeye başladı ve daha sonra Noel'i tamamlayan hafif bir uçak şeridi inşa etti. Sonraki haftalarda Cromwell Range ve ötesindeki bölgede bir dizi uzun devriye gezdi ve 9 Takım'dan bir devriye, Indagen köyüne ulaşmak için Mongi Nehri ve dağların kaynak sularının üzerinden geçti.[173] Geri çekilen Japon kuvvetlerine ait çok sayıda iz bulundu; ancak, tek temas Ocak 1944'ün başlarında gerçekleşti. 6 Ocak'ta yola çıkan 40 kişilik bir devriye, Çavuş Frederick Bendall'ın öğlen saatlerinde pusuya düşürüldü ve Papualılar panik içinde tüfeklerini düşürdüler. Hızla geri çekilerek Japonlar tarafından kovalandılar. Bir derede içki içmek için mola veren Papualılar saldırıya uğradı ve Bendall onunla ateşe karşılık verdi. Fırın tabancası, Papualılar geri çekilirken bir Japon askerini öldürdü. Kovalamaca devam etti ve öğleden sonra köşeye sıkıştırıldılar. Neredeyse silahsız bir şekilde kaçmak için bir şelalenin yanındaki bir uçuruma tırmanmaya zorlandılar. Yoğun bir sis biraz gizleme sağlıyordu; ancak Papualılardan biri tırmanış sırasında düştü ve öldüğüne inanılıyordu. Devriye, az yiyecek ve suyla, nihayet Finschhafen'a ulaşmadan önce dağları aşarak altı gün mücadele etti.[174][Not 9] Kayıp adamları aramak için bir dizi devriye gönderildi. Ancak dönüşlerinin ardından devriyeler devam etti ve biri dört Japon'un öldürülmesiyle sonuçlandı.[175] C Bölüğü Şubat ayı başlarında geri çekilerek Song Nehri'ndeki eski kamplarına geri döndü.[174] Kampanya sırasında şirket öldürülen on kişiyi kaybetti.[175]
Saidor – Sio, Ocak - Mart 1944
Şu anda bir Şirket, 20'inci Tugay'ın Saidor'a doğru çekilirken Japonları takip etmesini desteklemeye devam eden tek operasyonel PIB alt birimiydi.[174] Başlangıçta, Hitchcock'un Kasım ayında izne ayrılmasının ardından Teğmen Ernest Vickery'nin komutası altında, şirket, Tahkimat Noktası'ndan Sio'ya ve daha sonra Rai kıyısı boyunca Saidor'a çekilen Japonlarla yoğun temas halindeydi. Papua devriyeleri daha önce, 1943 Aralık ayının sonlarında ele geçirilmeden önce Tahkimat Noktası'na doğru hareket eden Avustralya kuvvetlerini desteklemek için faaliyet göstermişlerdi ve daha sonra batı kanadında derin devriye gezerek devam eden takibi desteklemişlerdi. 24 Aralık'ta 3 Takım, üç haftalık bir devriye gezisi ile Hompua üzerinden iç kesimlerde Zagahemi'ye gitti ve bu sırada üç Japon'u öldürdü. Takım daha sonra 2/4 Komando Filosuna bağlandı ve güneyde devriye gezdi. Masaweng Nehri.[176][177] Bu süre zarfında 5 Takım'dan bir devriye üç Japon daha öldürdü.[178] 29 Aralık'ta, A Company Genel Merkezi ve devriye gezmeyen şirketin geri kalanı, Walingai ve Kanomi'ye doğru kuzeye devam etmeden önce mavna ile Anchorage Point'e taşındı.[176] Bu arada, 4 Takım dört gün boyunca iç kesimlerde devriye gezerek kıyıdan Kanomi'ye döndü.[178]
ABD güçleri tarafından başlatılan bir dizi amfibi saldırının parçası olarak Torokina Bougainville'de Kasım 1943'ün başlarında, Arawe Güneybatı New Britain'da Aralık ortasında ve Cape Gloucester Yeni Britanya'nın batı ucunda aynı ayın sonlarında, 2 Ocak 1944'te ABD 126. Alayı Saidor'a indi Yeni Gine sahili boyunca ilerleyen Avustralya 9. Tümeni'nin önünde yaklaşık 160 kilometre (99 mil), Finschafen'ı ele geçirmek ve kuzeydeki bölgeyi Sio'ya korumakla görevlendirildi. Sonuç olarak, Japonların hayatta kalan unsurları 20'si ve 51. Tümenler üzerinde Huon Yarımadası Finisterre Sıradağları üzerinden geri çekilmek zorunda kaldılar.[179][180] Yine de Amerikalılar nihayetinde geri çekilen Japonları yok etme fırsatını yakalayamadılar ve hastalık ve açlıktan kaynaklanan ağır bedele rağmen Madang'a ulaşmayı başardılar, birçok Japon hayatta kaldı ve sonunda Avustralyalılar tarafından köşeye sıkıştırılmadan önce savaşmaya devam etti. Aitape – Wewak kampanyası 1945'te.[181] Bu arada, 4 Takım'ın devriyesi sırasında, Karako'ya ulaşmadan önce düşman yerliler tarafından saldırıya uğramışlardı. 4 Ocak'ta Walingi'nin kuzeyindeki Japon ile çatışarak dört kişiyi öldürdüler.[176][182] Ertesi gün Şirket Merkezi mavna ile Sialum'a taşındı.[183]
Bir Şirket, PIB sahil boyunca hareket etmeye başlarken, iç bölgeleri araştırmakla görevli 4 Takımdan dört kişilik bir devriye, D Şirketinden bir müfrezenin önüne taşındı. 2/24 Tabur. Bu devriye, açlıktan ölen Japonların cesetlerini bulurken, sağlıksız bir dizi diğerinin de çatışmalarda öldürüldüğü, Japonların şu anda yaşadığı akut tedarik sorunlarının bir göstergesi oldu.[176][183] 9 Ocak'ta Şirket Karargahı Kelanoa Limanı'na taşındı ve ardından 20. Tugay'ın komutasına girdi (4 Müfreze daha az).[183] Hızla hareket eden Papualılar, 13 Ocak'ta Kapugara Nehri'ni geçen 2 / 17'nci Tabur'un bir bölüğünü desteklediler. Goaling Nehri'ni geçtikten sonra Papualılar, daha önce Japonlar tarafından kullanılan Nambariwa köyüne girdiler. Altı Japon öldürüldü, dokuz kişinin cesedi ise yerleşim yerinin kalıntılarında bulundu.[176] 15 Ocak'ta 20. Tugay ele geçirilen Sio, hafif Japon direnişine karşı 9. Tümenin sahili hızlı süpürmesini tamamladı. 9. Bölüm daha sonra Avustralyalı tarafından rahatlatıldı. 5. Lig Japonların geri çekildikleri sırada devam eden takibi için.[172][184] Bir Şirket Merkezi daha sonra Sio'ya taşınırken, 18 Ocak'ta üç Japon, oradaki görevin arkasındaki bir devriye tarafından öldürüldü.[176] Bu arada, aynı gün 4 Takım'dan bir devriye 2/48 Tabur Pirinç taşıyan dört silahsız Japon'u öldürdü.[185] 21 Ocak'ta Papualılar, 8 Tugay ve keşif ve devriye görevlerine devam etti.[176] Ertesi gün, bölgedeki Japonların yerel raporlarını araştırmak için Lembangando Misyonuna gönderilen bir devriye, oradaki kilisede 30'a kadar Japon grubunu başarıyla pusuya düşürdü ve hiçbirinin hayatta kaldığına inanılmadı.[185][186] Başka bir devriye, akıntıya karşı bir üs oluşturmadan önce Kwama Nehri ağzındaki Vincke Noktasına kadar itti. Bölgede daha sonra orada önceki ağır çatışmalardan çok sayıda ölü Japon bulunduğu tespit edildi.[187]
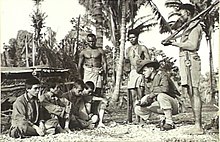
25 Ocak'ta A Company Merkezi Wasu'ya taşındı ve oradan kıyı boyunca devriye gezileri gönderildi. Bu dönemde Papualıların günde ortalama 12 ila 15 Japon öldürmesiyle ağır temas meydana geldi. Bu arada, diğer devriyeler Sigawara'dan Ulap Mission'a kadar iç kesimlerdeki eteklerden sahili kuşattı.[188] Singor ve Malsanga köylerinden geçen Papualılar, 30 Ocak'ta Timbi Nehri'ne ulaştı. Ertesi gün A Company, PIB ve ileri Avustralyalı birimler Crossingtown'a doğru ilerledi. Bununla birlikte, ilerlemenin onları tedarik sistemlerinin önüne geçirmesi ve lojistik sorunu artıran daha fazla Avustralyalı askerin gelişiyle birlikte, Papualılar yiyecek sıkıntısı çekmeye başladılar ve bir airdrop organize edilinceye kadar birkaç gün için azaltılmış tayınlara yerleştirildiler. . 4 Şubat'ta 5 Takım, Nemau'daki A Bölüğünün geri kalanıyla bağlantı kurdu. 30. Tabur, 5 Şubat'ta Butubutu'daki bir sonraki erzak sahiline ulaştı. Avustralya'nın sahil boyunca ilerlemesini bu noktaya götüren Papualılar, daha sonra iç yollarda keşif yapan bir müfreze ile yeniden görevlendirilirken, piyade sağda liderliği ele geçirdi. Bir Şirket, PIB daha sonra Sowat ve Urana Nehirlerine taşındı ve yolda sekiz Japon'u öldürdü. Papualılar, 7 Şubat'ta Avustralyalıların önüne geçerek 1 Numaralı Gali'ye ulaştı. Daha sonra Roinji ve Gali arasında bir Japon artçı tarafından ertelendi; ancak, bu kısa süre sonra savunucuların altısının öldürülmesiyle aşıldı.[188] 10 Şubat 1944'te sahil boyunca ilerleyen Avustralyalılar, Saidor'da Amerikan kuvvetleriyle bağlantı kurdu.[81]
Hitchcock daha sonra, A Bölüğü, PIB'nin komutanlığına devam ederek izinden döndü.[189] 12 Şubat'ta Gali'nin güneyinde bir devriye, dört Japon daha öldürdü. Ertesi gün Papualılar yeni gelirken durakladı 35 Tabur Birleşik Avustralya ve Papua kuvvetleri tarafından ilerleme yeniden başlatılmadan önce öne çıktı. Malamanai'de bulunan büyük bir Japon gücünün 35. Tabur tarafından, Papualılar arkalarını korurken saldırıya uğraması planlandı. 14 Şubat saat 09: 00'da başlayan deneyimsiz 35. Tabur, Avustralyalılara yoğun ateş yoğunlaştıran Japon savunucuları tarafından kuşatıldı. Papualılara yardım etmeleri emredildi, yolların her iki tarafındaki çalılıklara girdi ve Japonları kanatlarda pusuya düşürdü. Avustralyalılar ve Papualılar şiddetli çatışmaların ardından Japonları Saidor'a doğru çekilmeye zorladı.[188] 16 Şubat A Company'den başlayarak PIB, Avustralya'nın Japonları Ruange, Bwana No. 1, 2 ve 3, Tapen, Gubutamon ve Wandiluk dağ köylerinden itme çabasını destekledi. Şimdiye kadar Japonlar açlıktan ölüyordu ve çoğu yiyecek kaynağı olarak bölgedeki bahçelere ilgi duyuyordu. Köşeye sıkıştıklarında, sonuç olarak umutsuzca pozisyonlarını savunmaları beklenebilirdi. 21 Şubat'a kadarki dönemde, birçoğu A Company, PIB tarafından da dahil olmak üzere bölgede çok sayıda Japon öldürüldü.[190] Özel Matpi daha sonra Üstün Davranış Madalyası eylemleri için.[191][192]
25 Şubat'ta dağlarda faaliyet gösteren PIB müfrezeleri, seferdeki rolü sona ererken Wandiluk'un ötesine ilerlememeleri emredildi. Nokopo'da bir PIB devriyesi bir dizi aç Japon'u köy bahçelerinden kovdu.[191] Başka yerlerde, Amerikan kuvvetleri Şubat ayı sonunda Los Negros'u ele geçirdi ve Lorengau'da daha fazla operasyon için geniş bir üs alanı inşa etmeye başladı.[193] 3 Mart 1944'te A Şirketi, PIB geri çekildi ve Song Nehri'nde kurulan tabur dinlenme kampına taşındı.[194] Bir Şirket sekiz aydan fazla bir süredir konuşlandırılmıştı ve kampanyanın koşulları ve hızlı ilerleme, birkaç kişinin hastaneye tahliye edilmesiyle ona zarar verdi, zayiatlarında bir ölü vardı.[195] Kaligia'da C Company, PIB'nin bitişiğinde bir pozisyon işgal eden A Company, 11 Mart'ta tamamlandı ve Rai Sahili'ndeki eylemlere katılımını tamamladı. Bu arada, Port Moresby'den gelip A ve C Şirketlerinin komutasını devraldıktan sonra Watson altında bir Gelişmiş Tabur Karargahı kurulmuştu.[196]
Madang, Nisan - Ağustos 1944
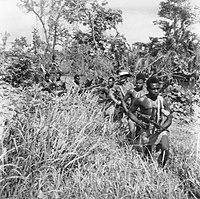
Avustralya kuvvetleri kıyı boyunca ilerlemeye devam ederken, 24 Nisan'da Madang'ı ele geçirmeden önce, 13 Nisan 1944'te Bogadjim'e ulaştılar. Alexishafen iki gün sonra.[193] PIB, Madang'ın güneybatısındaki bölgeye taşınmakla görevlendirildi ve hem A hem de C Şirketleri, Adelbert Sıradağları'nın doğusundaki alanda Avustralya 5. Bölümü'nü desteklemek için faaliyete geçti. Bir Şirket 22 Nisan'da Song River kampından ayrıldı, Saidor'a uçtu ve ertesi gün mavna ile Bogadjim'e taşınırken, C Şirketi 25 Nisan'da destroyerde deniz yoluyla Madang'a taşındı. HMASVendetta. 27 Nisan'da, C Bölüğü ve Gelişmiş Tabur Karargahı, devriyelere başlamadan önce Siabob'da A Bölüğü ile evlendi. Bir Bölük, Amele Nehri Misyonunun güneyinde, müfrezelerinden birinin küçük bir Japon kuvveti ile çatıştığı, C Bölüğünün Amaimon'un başına batı ve güneybatıda devriye gezeceği bir alan tahsis edildi.Gogol Nehri. Bir Şirket, 2 Mayıs'ta sahildeki Alexishafen'e taşındı ve Madang'ın kuzey ve batısında faaliyet göstermeye başladı ve C Şirketi güney batıyı ele geçirdi.[197] Gelişmiş Tabur Karargahı 9 Mayıs'ta kapatıldı ve personeli A ve C Bölüğüne transfer edildi.[198] C Şirketi, Mayıs ayının geri kalanını Amele çevresinde olaysız devriyeler yaparak geçirdi.[198]
Haziran ayının ilk haftasında, A Company devriyelerini karadaki Nagada ve Sarang'a uzatırken, bir şirketten bir bölüm ayrıldı. 37./52 Tabur Kar Kar Adası'nda faaliyet göstermektedir. C Şirketi, Madang'ın batısındaki devriyelerini genişletmek üzere Sanapi'de devriye gezerken, A Şirketi kıyıdan Dugumr Körfezi'ne taşındı ve 13 Haziran'da Bogia'ya ulaştı. Sahil boyunca daha da ilerleyerek Moresapa'ya taşınan şirket merkezi, Hansa Körfezi 16'sında. Daha sonra Ramu ve Sepik Nehirleri arasındaki kıyı bölgesinde devriye gezmekle görevlendirildi. Bu devriyeler sırasında Papualılar, düşen bir ABD bombardıman uçağından kurtulan sekiz kişiyi kurtarırken, birkaç Çinli sivil, Kızılderili savaş esirlerinden kaçtı ve hasta Japonlar da kurtarılırken, birkaç Japon küçük bir çatışmada pusuya düşürüldü ve öldürüldü.[199] Haziran ayında bir çöktü C-47 Dakota bulundu ve mürettebatından ikisi kurtarıldı.[200] Bu arada, C Company, yeniden konuşlandırmaya hazırlandıkları için Haziran ayında çok az faaliyette bulundu. 1 Temmuz 1944'te, Isaac I. Stevens Port Moresby'ye dönmek ve ardından Bisiatabu'da bulunan Tabur Karargahına hareket.[198]
5 Temmuz'da Watam Lagünü bölgesindeki bir A Company devriyesi, Singarin'de bulunan yaklaşık 100 kişilik bir Japon gücüne ilişkin istihbaratı ortaya çıkardı. Papualılar daha sonra Ramu ve Sepik nehirlerinde bir dizi araştırma yaptılar ve bir devriye Schilling Plantation'a ulaştı.[201] Yerel halktan alınan bilgiler, Japonların çoğunun öldüğünü veya başka bir şekilde kötü durumda olduklarını, yiyecek konusunda yetersiz olduklarını ve sadece hafif silahlı olduklarını gösterdi.[202] 8 Temmuz'da başka bir devriye, Sepik'teki Bien köyüne doğru hareket etti. Kanoların nehir ağzına inmesini zorunlu kılan devriyelerden biri onları yakındaki köylerden almaya çalıştı ancak intikam korkusuyla ihanete uğradı. O akşam pozisyonları Japonlarla çevriliydi. 9 Temmuz sabahı, 30 silahlı Sepik köylü tarafından desteklenen yaklaşık 20 Japon, tespit edilmeden karaya çıktı ve Papuan kampına saldırdı. Evlerde uyuyanlar bataklığa kaçarken, bir dizi Papualı alarma geçirildi ve ateşe karşılık verdi.[201] Birkaç saat sonra devriye Bien'de yeniden toplandı ve çok sayıda silah kaybedilmiş olmasına rağmen can kaybı olmadı.[203] Japonlar köyü işgal etti ancak bataklıktaki erkekleri takip etmedi ve sonunda bir bataklık ve orman labirenti boyunca ilerlediler, öğleden sonra küçük bir köye ulaşıp zorla 16 kilometre (10 mil) geldikten sonra dinlendiler. arazi. Ertesi gün Sepik'in ağzına ulaştılar ve daha sonra partinin geri kalanına yeniden katıldılar. Bu arada Watam'daki bir bölüm Sepik'in ağzının yakınında devriye gezerek Kopra Bank çevresindeki Japon hareketlerini gözlemledi. Bir Şirket, devriyelerine 8 Ağustos'a kadar devam etti ve ardından Alexishafen'e çekildi. 28 Ağustos 1944'te Port Moresby'ye döndüler. B Şirketi daha sonra, 28 Kasım 1944'te yeni yükselen bir Yeni Gine birimi tarafından rahatlatılıncaya kadar, Dumpu ile Annenberg arasındaki Ramu Nehri'ne dayanan bölgedeki tek PIB unsuru oldu.[204]
Ek yerel birimlerin oluşumu
1943'ün ikinci yarısında Avustralya hükümeti, MacArthur'un onayıyla, ordunun büyüklüğünün, Pasifik'te büyüyen İngiliz ve ABD kuvvetlerine tedarik sağlamak için gerekli olan savaşla ilgili endüstriler için insan gücünü serbest bırakmak için azaltılmasına karar verdi.[205] Ordunun boyutu küçültüldü, ancak savaşın sonuna kadar altı piyade tümeninden (üç AIF ve üç Milis) oluşan bir saldırı gücü sürdürüldü.[206] 1944'ün başlarında, Ordu'nun iki tümeninin tamamı, Atherton Tableland eğitim ve rehabilitasyon için.[207] Avustralya ordusunun Güney-Batı Pasifik'teki rolü daha sonra 1944'te ABD güçlerinin bölgedeki ana Müttefik çabalarının sorumluluğunu üstlenmesiyle azaldı.[208] Bu arada, PIB'nin başarısının bir sonucu olarak, 1943'ün sonlarında Yeni Gine Kuvvetleri Karargahı, Yeni Gine'de mevcut kuvvetleri desteklemek için yerli asker birlikleri toplamaya karar verdi.[10] 1 Yeni Gine Piyade Taburu (1 NGIB) Mart 1944'te kuruldu. 2 Yeni Gine Piyade Taburu (2 NGIB) 26 Eylül 1944'te kuruldu.[3] Yine de insan gücü azaltımı devam ederken, bu kayıplar kısmen Yeni Gine yerlilerinin daha fazla taburunun toplanmasıyla ve önümüzdeki 12 ay içinde dört tane daha toplama planlarıyla telafi edilecek.[209] Bu birlikler daha önce Yeni Gine kampanyası boyunca Avustralya birlikleriyle birlikte eylem görmüşlerdi ve büyük ölçüde yıl içinde dağıtılan Avustralya Ordusu taburlarının yerini aldılar.[210]
Ekim 1944'te, Pasifik Adaları Alayı (PIR) Papuan ve Yeni Gine birliklerinin üç taburunu yönetmek için.[211] Yine de Avustralya ordusu, PIR'ın kurulması konusunda güçlü şüphelere sahipti ve bu, silah kullanımı konusunda onları eğitirken, bazı çevrelerde yerel birliklerin etkinliği, disiplini ve güvenilirliği sorgulanmasıyla, ancak zorunlu olarak gerçekleştirildi. Savaş sonrası yönetim için potansiyel olarak bir sorun yaratıyor.[212][Not 10] PIB, 1. ve 2. Yeni Gine Piyade Taburları ile birlikte Kasım 1944'te PIR'ı oluşturmak üzere birleştirildi ve bir depo taburu oluşturuldu. 3 üncü ve 4 Yeni Gine Piyade Taburu Alay'a 1945'te katıldı, ancak 4 NGIB kısa süre sonra dağıtılırken, 5. Yeni Gine Piyade Taburu - yetkilendirilmiş olmasına rağmen - asla yükseltilmedi.[214] Her tabur yaklaşık 77 Avrupalı ve 550 yerli askerden oluşan bir düzene sahipti.[5] PIB, PIR'a dahil edildiğinde 700 kişilik bir güce sahipti.[10] PIR Genel Merkezi, 14 Şubat 1945'te Nadzab yakınlarındaki Diddy Kampı'nda büyütüldü.[215] Önceleri PIB, yerel Avustralya operasyon komutanları altında savaştığı sırada Yeni Gine Kuvvetinin idari kontrolü altındaydı; ancak ANGAU, 24 Mart 1944'te taburun idari sorumluluğunu devraldı. Birinci Ordu ANGAU idari sorumluluğu elinde tutarken, yeni alayın operasyonel kontrolünü devraldı.[216]
Yeniden yapılanma, 1944–1945
Şubat 1944'te Watson, Port Moresby ile A ve C Şirketi arasındaki mesafeden dolayı karargahının bir kısmını Song River'a transfer etmişti.[21] Watson, Nisan 1944'te PIB'den emekli oldu ve yerine artık yarbay olan Standfield geçti. Ramu Vadisi'nde bağımsız olarak faaliyet gösteren şirketler ile Madang ve Sepik pozisyonunun ağırlıklı olarak idari olduğu alanlar.[21] Taburun birlikleri, operasyonlardan geçici olarak çekildikten sonra Temmuz ve Kasım ayları arasında Port Moresby'ye geri döndü, personelin bir kısmı daha sonra kurulma aşamasında olan Yeni Gine Piyade Taburlarına nakledildi.[217] Bunu, tabur Port Moresby yakınlarındaki Bisiatabu'da eğitim verirken, yeniden yapılanma izledi. Ağustos 1944'te 2 NGIB kurma kararı, PIB'nin Yeni Gine askerlerini 1 ve 2 NGIB'ye kaybedeceği anlamına geliyordu, ancak bu Ekim ayı sonuna kadar yürürlüğe girmedi. Toplam 162 Yeni Gineliye nakledilmeleri tavsiye edildi, ancak taburlarına sadık kalmadan birçoğu ayrılmaya zorlanmaktan mutsuzdu ve hiçbir etkisi olmamasına rağmen 30 Ekim'de protesto etmek için kışlalarını barışçıl bir şekilde terk etti. İlk 60 Yeni Gineli 3 Kasım'da yürüdü. Papualılar daha sonra C Şirketi'ne tahsis edildi ve kalan Yeni Gineliler Depo Şirketi'ne tahsis edildi, bu sırada işe alım Kila'ya gönderilen ekiplerle birimi yeniden inşa etmeye başladı, Boroko Doğu Papua'da, Hanuabada, 12-Mile, 17-Mile, Ilolo, Dobuduru ve Milne Körfezi.[218] PIB'de görev yapan bir dizi Avustralyalı da bu sırada NGIB taburlarına veya Standfield dahil diğer birimlere transfer edildi. Lieutenant Colonel Sid Elliot-Smith, a former Resident Magistrate on Samarai Island with the Papuan Administration who had later served with ANGAU, would take over as commanding officer.[217]
The first Australian replacements for the PIB arrived in mid-November, while later that month the last of the New Guineans were ordered to prepare to move to Lae as reinforcements for 1 NGIB. On 12 December 1944, Standfield handed over command to Elliot-Smith. Meanwhile, further Australian replacements arrived in December after completing training with ANGAU.[83] Depot Company, PIB was disbanded at Bisiatabu in January 1945, and D Company raised in its place as a fourth rifle company on the same scale as the other three companies. Depot Battalion, PIR had been established by November 1944, and it subsequently took over this role.[215] At this time the European establishment of each platoon was reduced to just the platoon commander and platoon sergeant, removing the three section sergeants which had previously been provided for.[83] The battalion had built a fine war record, and except for a two-month break, elements of the unit had been in action continuously since the Japanese landing at Buna in July 1942. However, with the transfer of the New Guineans to the NGIB there were barely enough Papuans to man a company, and those that remained were internally posted in equal numbers throughout the battalion in preparation for the arrival of new recruits to fill the vacancies. In the months that followed the strength of the battalion grew, and by April 1945 it was operational again.[219] The PIB was next committed to the Bougainville Kampanyası, where its companies would be spread across the fronts from Bonis -e Buin savaşın son aylarında.[220]
Bougainville, Mayıs - Eylül 1945
On 22 November 1944, the Australian II Kolordu Korgeneral altında Stanley Savige took over responsibility for Allied operations on Bougainville from the US XIV Kolordu, and throughout November and December Australian units relieved the Americans who were redeployed for subsequent operations in the Philippines.[221] Although Japanese forces on Bougainville numbered around 40,000 men at this stage,[222] Allied intelligence had estimated that there were only about 17,500 defenders on the island. As a result of this error, Australian planning staff believed they were opposed by a roughly equal-sized force and Savige decided he would pursue an aggressive offensive campaign to clear the Japanese from Bougainville.[223] The Australian force consisted of the 3. Lig and two independent brigades, the 11 Tugay ve 23 Tugay.[224] The majority of the Japanese force was believed to be concentrated in the south and as a result the main effort of the Australian plan was focused upon driving towards Buin. Supporting operations were also conducted along two other fronts. In the north, it was planned that the Japanese would be forced into the narrow Bonis Peninsula and contained there while, in the centre, the Pearl Ridge'in ele geçirilmesi would give the Australians control of the east–west avenues of approach, as well as affording them protection against further karşı saldırılar and opening the way for a drive to the east coast.[225]

With the campaign continuing the PIB was committed to the fighting. On 15 May 1945, all four companies embarked at Port Moresby bound for Empress Augusta Bay on the west coast of Bougainville.[226] Arriving on 18 May, they then sailed for Torokina.[227] With the unit substantially rebuilt, for many the coming fighting would be their first experience of combat.[226] PIB involvement in the campaign would again see the companies operating as individually attached to larger units and formations, with the battalion widely dispersed across the area of operations. A Company was tasked to support the 26 Tabur on the Bonis Peninsula in the northern sector, B Company would support the 7'si ve 27th Battalions in the central sector along the Numa Numa Trail, C Company to Mokolina in the south attached to the 2/8th Commando Squadron operating in the hills east of the Buin Road, while D Company would support the 15th Brigade near Tai Tai, also in the southern sector. Meanwhile, Battalion Headquarters was established on Torokina.[226][228] With the PIB concentrated on Bougainville, by 1 June 1945 the battalion headquarters was established at McKenna Bridge, in the vicinity of Headquarters 3rd Division.[20] By this time the Australians had gained the ascendency. In the north the 11th Brigade had pushed the Japanese back to the Bonis Peninsula, the 23rd Brigade was in control of the Numa Numa Trail in the central sector, while in the south the lead Australian battalions from the 3rd Division had advanced to within 45 kilometres (28 mi) of Buin, and were threatening the main Japanese garden areas.[229] As Australian strength on Bougainville increased Savige planned the destruction of the Japanese on the island, intending to concentrate his forces in the south for the final advance on Buin, while maintaining sufficient strength in the northern and central sectors to maintain pressure on the defenders.[230]
After landing on 18 May 1945, A Company, under Jesser who was by now a major, moved by barge from Torokina to Soroken Plantation in the northern sector (less 1 and 2 Platoon which remained behind). Attached to the 26th Battalion, the Papuans started patrolling, with 3 and 4 Platoon moving across the narrow peninsula towards Siara, north of Ruri Bay. A number of sharp patrol clashes and ambushes followed during which the Papuans inflicted a large number of casualties on the Japanese.[231] On 3 June, 4 Platoon was patrolling in advance of D Company, 26th Battalion when it was ambushed and its platoon commander killed. By 9 June the platoons were back at Soraken Plantation, while on the 12th a patrol was sent north to Buoi Plantation, 2 miles (3 km) from Ratsua.[232] 5 Platoon subsequently operated with the 31st/51st Battalion Batı yakasında.[233] On 22 June a reconnaissance patrol moved north to Buoi in an attempt to locate barges used during an unsuccessful attempt Australian attempt to land behind Japanese lines at Porton Plantation, but was forced to withdraw after hitting a strong Japanese position.[232] The next month was mostly a period of rest, although reconnaissance patrols were sent to Ratsua, Tanimbau Bay and Ruru Bay. On 10 July the company established a base area around Ratsua. While 4 and 5 Platoon were tasked with scouting the road west of Ruri Bay.[234] At this time Major Raymond Oliver took over command from Jesser.[235] On 29 July at patrol from 4 Platoon was engaged in heavy fighting with a force of approximately 30 Japanese in a strong defensive position, but was able to conduct a fighting withdrawal supported by 5 Platoon, after losing one man killed.[236] Another heavy clash two days later west of Ruri Bay which saw A Company inflict heavy casualties on a Japanese force of about 20 men, forcing the survivors to flee. On 7 August a patrol from 5 Platoon was tasked with establishing a base on the road south of the junction of the Numa Numa beach roads. Moving south, the Papuans located a camp before clashing with several groups of Japanese, many of whom were killed. The platoon then withdrew without loss in what proved to be A Company's last action on Bougainville.[237]
Meanwhile, in late May 1945, B Company, PIB, under the command of Captain Leo Hunt, relieved troops from 1 NGIB, who had been patrolling continuously in the central sector since the start of the campaign.[238][239] Operating with the newly arrived 7th Battalion which had been tasked with eliminating the forward Japanese positions as part of the renewed offensive, they faced the remnants of Japanese forces along the Numa Numa Trail and around Sisivie and Ibu on the track to Asitavi Point on the coast.[240] Initially concentrated north of Keenan's Ridge on Arty Hill, over the period 23 May to 3 June a patrol from 7 Platoon was tasked with cutting the Japanese lines of communication on the Numa Numa Trail, killing 11 Japanese in a series of patrol clashes and ambushes over a 12-day period.[241] A patrol from 8 Platoon departed on 8 June, rejoining the company which was now located on Hunt's Hill on the 15th after an uneventful patrol. From there B Company patrolled the rear of Wearne's Hill and the Numa Numa Trail. On 2 July, 7 Platoon clashed with a group of Japanese while patrolling around Wearne's Hill, killing 5 Japanese before calling down artillery as they withdrew. After a period of rest patrols began again on 22 July, with a clearing patrol from 8 Platoon locating two Japanese listening posts, killing seven.[242] The following day 8 Platoon began a nine-day patrol, leaving Hunt Hill and establishing a base near Tokoa with D Company, 7th Battalion. Following up reports of Japanese in the area, 8 Platoon patrolled to Nasisipok on 24 July. Locating a Japanese position the Papuans killed nine before the platoon was forced to retire under heavy fire which wounded the platoon commander. Returning three days later the Japanese position was found to be deserted.[243] During heavy fighting on Kaipu Ridge on 28 July, a PIB section was attached to an Australian platoon which moved behind the ridge to cut the line of communication of the small but well established Japanese force, which was finally overrun that afternoon by the infantry after a heavy artillery preparation. On 8 August, 6 and 8 Platoon patrolled behind Pearl Ridge to the Wakunai River, ambushing a Japanese water point and killing four. B Company, PIB was then withdrawn to Torokina.[244]
In the southern sector, as the Australian infantry advanced towards Buin supported by tanks and engineers, the 2/8th Commando Squadron had been operating in the mountains on the flank.[245] Acting independently, the Squadron was later joined by soldiers from C Company, PIB commanded by Captain Gordon Smith.[246][247] In May 1945 they were designated "Raffles Force" under the command of Major Norman Winning; however, operations proved disappointing. Winning was later critical of the performance of the PIB, believing that discipline among the Papuans had been poor due to the limited number of European platoon commanders and sergeants who also lacked combat experience and were not yet used to working with native soldiers, while the Papuans had also seemed to be fearful of artillery and would not accompany forward observation officers. There had also been friction and distrust between the Papuans and their Bougainvillean guides, with Winning alleging that the Papuans had secretly threatened the guides from Buka not to lead them to any difficult targets or into situations from which they could not quickly escape. When the 2/8th Commando Squadron moved to Kilipaijino in July the PIB remained at Morokaimoro in order to patrol the Buin and Commando Roads and operate against Japanese infiltration in the area.[246] On 14 August—the day prior to the cessation of hostilities on Bougainville—a patrol from 11 Platoon moving down the river trail to Hanung, between the Koroko and Mobiai Rivers, was ambushed by a Japanese force of approximately 60 men after being sent to the area to follow up reports of Japanese in the area wishing to surrender. Despite being heavily outnumbered, the Papuans killed 12 Japanese for the loss of one killed and one wounded. Corporal Geai was awarded the Distinguished Conduct Medal.[239]

Also operating in the southern sector, D Company, PIB under the command of Captain James Flucker, arrived in mid-May and were allocated an area of operations on the northern bank of the Hari River in support of the 15th Brigade.[248] Setting up camp in an area still under heavy fire from the Japanese around Ruani, several Papuans were wounded before operations began. D Company was initially tasked with probing the defences near Anderson's Crossing, during which a patrol clashed with a Japanese squad, killing seven. On 26 May the company moved forward to the Hongorai Nehri. Soon after two Papuans were wounded in an ambush, while another was killed by a booby trap.[228] On 12 June, during a patrol along the Hongorai–Taiati track, 12 Platoon observed a group of Japanese preparing a covering position, killing two, wounding one, and forcing the rest withdraw.[249] Meanwhile, another patrol surprised a Japanese listening post south of the Mamagota–Buin Road junction, killing three. By 18 June, the company was concentrated at Rusei, and began probing east along the Buin Road. On 25 June a patrol from 12 Platoon detected a group of Japanese building a bunker, and killed two after pursuing them through the bush. However, with the rains commencing, the swollen creeks and rivers in the area limited operations, with D Company resting in a position north of the Mivo River during this time.[250] On 14 July a patrol operated with elements of the 42.Tabur to establish a base 1.6 kilometres (1 mi) east. Departing on 19 July, another patrol located a missing Australian patrol cut-off by the Japanese and the flooding Mivo. Several wounded Australians were helped across the river that evening, while the remainder were led out the next day with the Papuans killing four Japanese and wounding another. On 27 July, a patrol from 12 Platoon east of the Mivo located a Japanese ambush, killing five. On 1 August, another 12 Platoon patrol attacked a Japanese camp near the Mivo River, killing several defenders and forcing the rest to withdraw. On 3 August, a patrol from D Company killed 12 Japanese in an ambush east of the Mivo crossing on the Buin Road. On 9 August, 12 Platoon was involved in the company's last action of the campaign, killing 14 when they surprised a Japanese patrol west on the Aku–Shishigatero track.[247]
By mid-August, following the dropping of two atomic bombs on Hiroshima and Nagasaki and Japan's subsequent koşulsuz teslim, a cease-fire was ordered on the island and although there were minor clashes following this, it spelt an end to major combat operations.[251] Although in many parts of the island Japanese forces had been ravaged by deprivation, in places where they were still healthy and held strong positions they maintained formidable resistance. Recognised for their skills in the jungle, the Papuans, like the New Guineans elsewhere, had been used in reconnaissance patrols prior to attacks or to locate positions suitable for use by artillery forward observers. Yet at times there had been friction and distrust between the Australian and the Papuan troops. According to Regan and Griffin, during the campaign native soldiers were sometimes used to complete dangerous tasks that Australians had been reluctant to do, while PIB soldiers and their officers also expressed anger at Australian units not acting on their reports, resulting in them having to repeatedly reconnoitre the same area.[252] Some Australian units also reported that on occasion Papuan or New Guinean guides had deliberately led them away from Japanese positions.[253] PIB casualties during the fighting on Bougainville were six killed and 29 wounded, while Japanese losses at their hands were estimated at 382 killed, 43 wounded, and 105 captured.[254]
Dağılma
By the end of the war the PIB had sustained casualties of 32 killed, 15 missing, 42 died and 25 wounded, consisting of 23 Europeans and 91 natives.[255][Not 11] Although the number of Papuans that served in the conflict was relatively small in comparison to the Australians or Americans, being used in scouting and patrolling and often attached to far larger formations or in support of Allied intelligence, Sinclair argues that they had filled an important role out of proportion to their size.[257][Not 12] Members of the battalion received the following decorations: one Distinguished Service Order, three Military Crosses, bir George Madalyası, three Distinguished Conduct Medals, 15 Military Medals, and three Gönderilerde Bahsedildi.[Not 13] The PIB was recorded as having killed 1,476 Japanese soldiers during the operations it was involved in.[256] Such was their effectiveness the Japanese referred to the PIB as "Green Shadows" (Ryokuin) due to their ability to fade into and appear from the jungle unexpectedly, with its soldiers becoming noted for their ferocity and tenacity. Captured documents also referred to the PIB as "Savage Unit" (Yabanjin Tai) or "Savage Soldiers" (Yabanjin Hei).[261] Despite initial disapproval from some prominent settlers prior to the war, the Papuan and New Guinean soldiers also came to be thought of highly by many senior Australian officers who considered them "...fighters skilled in stealth and surprise attack, men whose knowledge of the bush and experience in tribal warfare could advance the Allied cause."[213] Yet military discipline among the native soldiers was reportedly an issue at times, with some men known to have taken advantage of their positions, while there were also cases of rape, looting and theft, particularly when detached or otherwise unsupervised.[262]

On 18 September 1945 the battalion moved to Torokina, before relocating again to Fauro Adası in December to guard Japanese prisoners of war. Completing this duty in March 1946 they moved to Blanche Bay, near Rabaul, to guard Japanese prisoners there.[263] The battalion was disbanded in August 1946,[3] with the last members leaving Rabaul on 21 June.[264] The soldiers of the Pacific Islands Regiment mostly went back to their villages and resumed their pre-war lives, although many struggled to readjust to being civilians again. Some expressed resentment at being treated poorly after their wartime service, having expected material rewards and improvements in the quality of life of the native population after the war. Many former soldiers became farmers, while others joined the public service, or came to prominence in local government. Still others joined the Royal Papua and New Guinea Constabulary. Perhaps surprisingly though, relatively few played a part as leaders in the political change which began in Papua New Guinea in 1960s, including the first general elections in 1964.[265] Yet the experience of the war forever altered PNG, helping to change the perceptions of many Papua New Guineans of relations between the races from that which had existed in pre-war colonial society, with many coming to view themselves as the equals of Europeans as a result. This was due at least in part to the attitudes displayed by many Australian and US servicemen during the war which had often been more egalitarian than those of the small resident European population that had generally held itself aloof.[266]
In the years immediately following the war the Australian Army considered re-establishing a military presence in Papua New Guinea, although there was some opposition among the colonial administration and white settlers to the raising of native units, echoing previous concerns. As an interim measure, the re-establishment of the NGVR was approved in July 1949, re-forming as a whites-only reserve unit of the Citizen Military Forces (CMF). However, in November 1950, after considerable debate, the raising of a locally recruited regular battalion was authorised.[5] Consequently, in March 1951 the Pacific Islands Regiment was reformed, with an initial strength of one battalion.[267] Yet due to the age requirements imposed most former members of the wartime regiment were ineligible to re-enlist, and only a few of the youngest members were accepted, although many of those that did later rose to seniority as non-commissioned officers and provided a core of experienced personnel.[268] Drawing its lineage from the PIB and NGIBs, the PIR was awarded their Second World War battle honours in 1961.[269][270][271] A second battalion was also authorised, subsequently being raised in 1965. The regiment remained a unit of the Australian Army until Papua Yeni Gine kazandı bağımsızlık in 1975. Renamed the Royal Pacific Islands Regiment in 1985, today the regiment continues to exist as part of the Papua Yeni Gine Savunma Gücü.[267]
Savaş onurları
The PIB was awarded the following battle honours:[Not 14]
- İkinci dünya savaşı: South West Pacific 1942–45, Kokoda Trail, Kokoda–Deniki, Nassau Bay, Tambu Bay, Finschhafen, Scarlet Beach, Liberation of Australian New Guinea, Sio–Sepik River, Kaboibus–Kiarivu and Bonis–Porton.
Komutanlar
The following officers commanded the PIB:[21][215]
- Major L. Logan (1940–1942)
- Majör W.T. Watson (1942–1944)
- Lieutenant Colonel E.A. Standfield (1944)
- Lieutenant Colonel S. Elliott-Smith (1944–1945)
Notlar
Dipnotlar
- ^ Granted under Article 22 of the Milletler Cemiyeti Sözleşmesi, the mandate imposed restrictions on the establishment of military and naval bases, fortifications, and the military training of local inhabitants for purposes other than the maintenance of law and order.[6][7]
- ^ Ultimately such measures were not extended to the mandated territory of New Guinea until 1944 after which natives were recruited for service in the 1 inci, 2., 3 üncü ve 4th New Guinea Infantry Battalions.[5]
- ^ This was in contrast to the Pacific Islands Regiment which later used Pidgin İngilizce, although most soldiers reverted to their tribal language when under pressure.[11]
- ^ In reality the "gap" was a misnomer, being little more than a broad dip in the Owen Stanleys.[48]
- ^ The action at Awala later assumed significance for Papuan New Guineans. Until 1981 PNG had commemorated its war dead on Anzak Günü; however, since then Remembrance Day has been observed on 23 July.[55]
- ^ According to Collie and Marutani the Papuans had been "...pressed into joining the military by an authoritarian administration. They had little heart for it. The war with Japan, after all, was Australia's business. The Japanese were just another group of strangers intruding in their country."[57]
- ^ The involvement of the 49th Battalion in the campaign ultimately proved limited. After attempts to fly-in elements of the battalion to Kokoda proved abortive,[64][65] they conducted long-range patrols along the Goldie River as part of Honner Force, and established standing patrols between the Goldie and Laloki Rivers.[66]
- ^ According to another source the PIB lost three Australians and eight Papuans to enemy action or illness during this period.[77]
- ^ According to Byrne the Papuan soldier was only injured and after being left for dead returned to the company position days later, following treatment he was evacuated to hospital.[175]
- ^ These concerns had mirrored those held by prominent settlers before the war, some of whom considered that natives "...might be useful as cheap labour but would run at the first sound of bombardment... and could not be trusted with firearms."[213]
- ^ These figures are different to those in Sinclair, who lists casualties of 22 Europeans and 98 natives.[256]
- ^ When the tens of thousands of Papuans and New Guineans employed as labourers were considered, in addition to those fighting as part of the PIR or RPC, or those employed as guerrillas or locally employed carriers, the Australian official historian, Gavin Long, felt the burden of the war fell more heavily on the native population than it did on that of Australia.[258]
- ^ Figures for awards to members of the PIB are difficult to accurately determine as most sources are incomplete, these figures are from Sinclair.[259][260] However, neither Sinclair nor Byrnes seem to include a complete list.
- ^ The battle honours listed above are those awarded to the PIR in 1961 and include those of both the PIB and NGIB.[269][270] [271]
Alıntılar
- ^ Downs 1999, s. 32.
- ^ Byrnes 1989, s. 4–5.
- ^ a b c d Sinclair 1990, s. 296.
- ^ Downs 1999, s. 34.
- ^ a b c d Dennis ve diğerleri 2008, s. 404.
- ^ Downs 1999, s. 19.
- ^ Sweeting 1970, s. 670.
- ^ Sinclair 1990, pp. 132 & 296.
- ^ a b c d e f Sinclair 1990, s. 132.
- ^ a b c d e "Pacific Islands Regiment". İkinci Dünya Savaşı, 1939-1945 birimleri. Avustralya Savaş Anıtı. Arşivlenen orijinal 31 Ekim 2013 tarihinde. Alındı 4 Kasım 2013.
- ^ a b Byrnes 1989, s. 197.
- ^ Byrnes 1989, pp. 5 & 203.
- ^ Byrnes 1989, s. 5.
- ^ a b Bradley 2008, s. 2.
- ^ a b c d e Powell 2003, s. 7.
- ^ McCarthy 1959, s. 39.
- ^ a b Dennis ve diğerleri 2008, s. 439.
- ^ a b c d e McCarthy 1959, s. 45.
- ^ Byrnes 1989, s. 5–6.
- ^ a b Byrnes 1989, s. 109.
- ^ a b c d Byrnes 1989, s. 111.
- ^ Byrnes 1989, s. 115.
- ^ a b c d e Byrnes 1989, s. 6.
- ^ Sinclair 1990, s. 133.
- ^ Sinclair 1990, s. 133–134.
- ^ a b c d e Sinclair 1990, s. 134.
- ^ McCarthy 1959, s. 44–45.
- ^ a b Sinclair 1990, s. 123.
- ^ Powell 2003, s. 8.
- ^ McCarthy 1959, s. 42.
- ^ McCarthy 1959, s. 44.
- ^ Wigmore 1957, s. 410.
- ^ a b Powell 2003, s. 9.
- ^ Downs 1999, s. 294.
- ^ Byrnes 1989, s. 6–7.
- ^ Powell 2003, pp. 13 & 19.
- ^ a b c d Byrnes 1989, s. 7.
- ^ Kuring 2004, s. 153.
- ^ a b c d e Sinclair 1990, s. 135.
- ^ Bradley 2008, s. 5–6.
- ^ Downs 1999, s. 27.
- ^ Byrnes 1989, s. 7; Harold Jesser, personal account.
- ^ Gillison 1962, pp. 457–459.
- ^ a b Byrnes 1989, s. 8.
- ^ Sinclair 1990, s. 125.
- ^ a b c d e f Dennis ve diğerleri 2008, s. 385.
- ^ a b McCarthy 1959, s. 114.
- ^ Kienzle 2011, s. 110.
- ^ McCarthy 1959, s. 114–117.
- ^ McCarthy 1959, s. 124.
- ^ McCarthy 1959, s. 122–125.
- ^ a b c d e f Coulthard-Clark 2010, s. 222.
- ^ Sinclair 1990, s. 125–126.
- ^ Byrnes 1989, s. 9.
- ^ a b Bradley 2013, s. 46.
- ^ McCarthy 1959, s. 125.
- ^ a b Collie & Marutani 2012, s. 67.
- ^ a b c Byrnes 1989, s. 10.
- ^ McCarthy 1959, s. 125–126.
- ^ McCarthy 1959, s. 126.
- ^ a b Keogh 1965, s. 176.
- ^ a b c d Byrnes 1989, s. 11.
- ^ McCarthy 1959, s. 129–130.
- ^ Brune 2004, s. 108.
- ^ Williams 2012, s. 55.
- ^ Cranston 1983, s. 169–171.
- ^ a b Thompson 2008, s. 325.
- ^ Keogh 1965, s. 182.
- ^ a b Bradley 2008, s. 47.
- ^ Keogh 1965, s. 183.
- ^ Sinclair 1990, s. 126.
- ^ Byrnes 1989, s. 14.
- ^ Coulthard-Clark 2010, s. 222–223.
- ^ Byrnes 1989, sayfa 12–13.
- ^ Byrnes 1989, s. 15.
- ^ Byrnes 1989, pp. 15–18.
- ^ a b Byrnes 1989, s. 18.
- ^ Byrnes 1989, s. 18–19.
- ^ "Four Peoples at War". The Kokoda Track: Exploring the Site of the Battle Fought By Australians in World War II. Department of Veterans' Affairs. 2014. Alındı 23 Ocak 2014.
- ^ Byrnes 1989, s. 112.
- ^ a b c d e f Dennis ve diğerleri 2008, s. 386.
- ^ a b c Byrnes 1989, s. 19.
- ^ a b c Byrnes 1989, s. 72.
- ^ Sinclair 1990, s. 304.
- ^ Bradley 2010, s. 165.
- ^ a b Sinclair 1990, s. 162.
- ^ Dexter 1961, s. 99.
- ^ Bradley 2010, s. 171.
- ^ Dexter 1961, s. 99–100.
- ^ a b Bradley 2010, s. 233.
- ^ Sinclair 1990, s. 163–164.
- ^ a b Bradley 2010, sayfa 233–234.
- ^ a b c d Byrnes 1989, s. 24.
- ^ Dexter 1961, s. 143.
- ^ Sinclair 1990, s. 164.
- ^ a b c Sinclair 1990, s. 165.
- ^ Bradley 2010, s. 235–238.
- ^ Bradley 2010, sayfa 245–246.
- ^ Dexter 1961, s. 210–211.
- ^ Bradley 2010, s. 243.
- ^ Sinclair 1990, s. 166.
- ^ Dexter 1961, s. 215.
- ^ Sinclair 1990, s. 168.
- ^ Dexter 1961, s. 294.
- ^ Sinclair 1990, s. 168–169.
- ^ Sinclair 1990, s. 169.
- ^ Byrnes 1989, s. 31.
- ^ Byrnes 1989, s. 26.
- ^ Dexter 1961, s. 309.
- ^ a b Sinclair 1990, s. 170.
- ^ a b Byrnes 1989, s. 27.
- ^ a b Sinclair 1990, s. 172.
- ^ Byrnes 1989, s. 45.
- ^ Sinclair 1990, sayfa 173–174.
- ^ a b c d e Sinclair 1990, s. 174.
- ^ Dexter 1961, pp. 337–341.
- ^ Bradley 2004, s. 7.
- ^ Dexter 1961, s. 346.
- ^ Sinclair 1990, s. 174–175.
- ^ a b Coulthard-Clark 2010, s. 241.
- ^ a b Byrnes 1989, s. 49.
- ^ Coulthard-Clark 2010, sayfa 241–242.
- ^ Sinclair 1990, s. 175.
- ^ Byrnes 1989, s. 49–50.
- ^ Dexter 1961, s. 422.
- ^ a b Sinclair 1990, s. 176.
- ^ Dexter 1961, s. 396–400.
- ^ Sinclair 1990, s. 176–177.
- ^ a b Byrnes 1989, s. 57.
- ^ a b c d e Sinclair 1990, s. 177.
- ^ a b c d e Sinclair 1990, s. 178.
- ^ Byrnes 1989, s. 28–29.
- ^ Byrnes 1989, s. 29.
- ^ Sinclair 1990, s. 179.
- ^ Dexter 1961, s. 596.
- ^ Dexter 1961, s. 600–601.
- ^ Sinclair 1990, s. 179–180.
- ^ Dexter 1961, s. 680.
- ^ a b c d Sinclair 1990, s. 180.
- ^ Byrnes 1989, s. 52–53.
- ^ Dexter 1961, s. 689.
- ^ Byrnes 1989, s. 53.
- ^ a b Byrnes 1989, s. 53–54.
- ^ Dexter 1961, s. 690.
- ^ Dexter 1961, pp. 691–695.
- ^ Sinclair 1990, s. 180–182.
- ^ Byrnes 1989, s. 54–55.
- ^ Byrnes 1989, s. 55.
- ^ Byrnes 1989, s. 55–56.
- ^ a b c Sinclair 1990, s. 183.
- ^ a b c Byrnes 1989, s. 59.
- ^ Johnston 2002, s. 159.
- ^ Dexter 1961, s. xix.
- ^ Coates 1999, s. 70–76.
- ^ Sinclair 1990, s. 183–184.
- ^ a b Sinclair 1990, s. 185.
- ^ Coates 1999, pp. 72–75.
- ^ Sinclair 1990, s. 185–186.
- ^ a b c Sinclair 1990, s. 186.
- ^ Coates 1999, s. 180–182.
- ^ Bradley 2013, s. 324–325.
- ^ Coates 1999, s. 185–186.
- ^ a b c Sinclair 1990, s. 187.
- ^ a b c Sinclair 1990, s. 188.
- ^ a b Sinclair 1990, s. 189.
- ^ Coates 1999, s. 60.
- ^ Bradley 2013, s. 334.
- ^ a b Sinclair 1990, s. 189–190.
- ^ a b c Sinclair 1990, s. 190.
- ^ Dexter 1961, s. 714.
- ^ Dexter 1961, pp. 668 & 717.
- ^ a b Johnston 2002, s. 183.
- ^ Sinclair 1990, s. 190–191.
- ^ a b c Sinclair 1990, s. 191.
- ^ a b c Byrnes 1989, s. 69.
- ^ a b c d e f g Sinclair 1990, s. 192.
- ^ Byrnes 1989, sayfa 31–32.
- ^ a b Byrnes 1989, s. 32.
- ^ Bradley 2013, s. 376.
- ^ Sinclair 1990, s. 129.
- ^ Coates 1999, s. 251.
- ^ Byrnes 1989, s. 32–33.
- ^ a b c Byrnes 1989, s. 33.
- ^ Sinclair 1990, s. 129–130.
- ^ a b Byrnes 1989, s. 34.
- ^ Sinclair 1990, s. 192–193.
- ^ Sinclair 1990, s. 193–194.
- ^ a b c Sinclair 1990, s. 194.
- ^ Byrnes 1989, s. 36.
- ^ Sinclair 1990, s. 194–195.
- ^ a b Sinclair 1990, s. 195.
- ^ Byrnes 1989, s. 234.
- ^ a b Sinclair 1990, s. 130.
- ^ Sinclair 1990, s. 203.
- ^ Byrnes 1989, s. 35–37.
- ^ Byrnes 1989, s. 37.
- ^ Sinclair 1990, s. 204.
- ^ a b c Byrnes 1989, s. 70.
- ^ Sinclair 1990, s. 207–208.
- ^ Byrnes 1989, s. 42.
- ^ a b Sinclair 1990, s. 208.
- ^ Byrnes 1989, s. 42–43.
- ^ Byrnes 1989, s. 43.
- ^ Sinclair 1990, s. 211.
- ^ Hasluck 1970, s. 623.
- ^ Palazzo 2001, s. 177–178.
- ^ Horner 1982, s. 302.
- ^ Johnston 2005, s. 14.
- ^ Long 1973, s. 407.
- ^ Uzun 1963, s. 82–83.
- ^ Byrnes 1989, s. 186.
- ^ Sinclair 1992, s. 44–45.
- ^ a b Denoon & Meleisea 2004, s. 301.
- ^ Sinclair 1990, pp. 231 & 273.
- ^ a b c Sinclair 1990, s. 305.
- ^ Powell 2003, s. 24.
- ^ a b Byrnes 1989, s. 111–112.
- ^ Byrnes 1989, s. 71.
- ^ Byrnes 1989, s. 73.
- ^ Regan & Griffin 2005, s. 192.
- ^ Keogh 1965, s. 416.
- ^ Grey 2008, s. 191.
- ^ Johnston 2007, s. 30.
- ^ Dennis ve diğerleri 2008, s. 389.
- ^ Johnston 2007, s. 30–31.
- ^ a b c Byrnes 1989, s. 74.
- ^ Sinclair 1990, s. 231.
- ^ a b Sinclair 1990, s. 232.
- ^ James 2012, s. 107–108.
- ^ James 2012, s. 108.
- ^ Byrnes 1989, s. 76.
- ^ a b Sinclair 1990, s. 242.
- ^ Byrnes 1989, s. 78.
- ^ Sinclair 1990, s. 243.
- ^ Byrnes 1989, s. 79.
- ^ Sinclair 1990, sayfa 243–244.
- ^ Sinclair 1990, pp. 244–246.
- ^ James 2012, s. 107.
- ^ a b Sinclair 1990, s. 236.
- ^ James 2012, s. 108–110.
- ^ Sinclair 1990, sayfa 236–237.
- ^ Sinclair 1990, s. 239.
- ^ Sinclair 1990, sayfa 239–241.
- ^ Sinclair 1990, sayfa 241–242.
- ^ James 2012, s. 213.
- ^ a b James 2012, s. 215.
- ^ a b Sinclair 1990, s. 234.
- ^ Byrnes 1989, s. 96.
- ^ Sinclair 1990, s. 232–233.
- ^ Sinclair 1990, s. 233.
- ^ Uzun 1963, s. 226.
- ^ Regan & Griffin 2005, s. 192–193.
- ^ Regan & Griffin 2005, s. 193.
- ^ Sinclair 1990, pp. 155 & 306.
- ^ Byrnes 1989, s. 269.
- ^ a b Sinclair 1990, s. 283.
- ^ Sinclair 1990, s. 131.
- ^ Uzun 1963, s. 83.
- ^ Sinclair 1990, pp. 298–302.
- ^ Byrnes 1989, pp. 228–246.
- ^ Byrnes 1989, s. 1–2.
- ^ Sinclair 1990, s. 207.
- ^ Byrnes 1989, s. 121.
- ^ Byrnes 1989, s. 122.
- ^ Sinclair 1990, s. 284.
- ^ Byrnes 1989, s. 191–192.
- ^ a b Dennis ve diğerleri 2008, s. 405.
- ^ Byrnes 1989, s. 197–198.
- ^ a b Byrnes 1989, s. ii.
- ^ a b Sinclair 1992, s. 82.
- ^ a b Festberg 1972, s. 25.
Referanslar
- Bradley, Phillip (2004). On Shaggy Ridge: The Australian Seventh Division in the Ramu Valley Campaign: From Kaiapit to the Finisterre Ranges. South Melbourne, Victoria: Oxford University Press. ISBN 0-1955-5100-1.CS1 bakimi: ref = harv (bağlantı)
- Bradley, Phillip (2008). The Battle for Wau: New Guinea's Frontline 1942–1943. Port Melbourne, Victoria: Cambridge University Press. ISBN 978-0-521-89681-8.CS1 bakimi: ref = harv (bağlantı)
- Bradley Phillip (2010). Salamaua'ya. Port Melbourne, Victoria: Cambridge University Press. ISBN 978-0-521-76390-5.CS1 bakimi: ref = harv (bağlantı)
- Bradley, Phillip (2013). Hell's Battlefield: To Kokoda and Beyond (İkinci baskı). Crows Nest, New South Wales: Allen and Unwin. ISBN 978-1-74331-755-6.CS1 bakimi: ref = harv (bağlantı)
- Brune, Peter (2004). A Bastard of a Place: The Australians in Papua. Crows Nest, Yeni Güney Galler: Allen ve Unwin. ISBN 1-74114-403-5.CS1 bakimi: ref = harv (bağlantı)
- Byrnes, G.M. (1989). Green Shadows: A War History of the Papuan Infantry Battalion, 1 New Guinea Infantry Battalion, 2 New Guinea Infantry Battalion, 3 New Guinea Infantry Battalion. Newmarket, Queensland: G.M. Byrnes. ISBN 0-7316-6716-6.CS1 bakimi: ref = harv (bağlantı)
- Coates, John (1999). Bravery Above Blunder: The 9th Australian Division at Finschhafen, Sattelberg, and Sio. South Melbourne, Victoria: Oxford University Press. ISBN 0-19-550837-8.CS1 bakimi: ref = harv (bağlantı)
- Collie, Craig; Marutani, Hajime (2012) [2009]. The Path of Infinite Sorrow: The Japanese on the Kokoda Track. Crows Nest, New South Wales: Allen and Unwin. ISBN 978-1-74237-591-5.CS1 bakimi: ref = harv (bağlantı)
- Coulthard-Clark, Chris (2010). Avustralya Savaşları Ansiklopedisi (Üçüncü baskı). Crows Nest: Allen and Unwin. ISBN 978-1-74237-335-5.CS1 bakimi: ref = harv (bağlantı)
- Cranston, Fred (1983). Always Faithful: A History of the 49th Infantry Battalion, 1916–1982. Brisbane, Queensland: Boolarong Publications. ISBN 978-0-908175-60-4.CS1 bakimi: ref = harv (bağlantı)
- Dennis, Peter; Gray, Jeffrey; Morris, Ewan; Önce Robin; Bou, Jean (2008). Avustralya Askeri Tarihinin Oxford Arkadaşı (İkinci baskı). Melbourne, Victoria: Oxford University Press. ISBN 978-0-19-551784-2.
- Denoon, Donald; Meleisea, Malama (2004). The Cambridge History of the Pacific Islanders. Port Melbourne, Victoria: Cambridge University Press. ISBN 0-5210-0354-7.CS1 bakimi: ref = harv (bağlantı)
- Dexter David (1961). Yeni Gine Taarruzları. 1939–1945 Savaşı'nda Avustralya. Seri 1 - Ordu. Cilt 6. Canberra: Avustralya Savaş Anıtı. OCLC 2028994.CS1 bakimi: ref = harv (bağlantı)
- Downs Ian (1999). Yeni Gine Gönüllü Tüfekler NGVR 1939–1943: Bir Tarih. Broadbeach Waters, Queensland: Pacific Press. ISBN 1-875150-03-X.CS1 bakimi: ref = harv (bağlantı)
- Festberg, Alfred (1972). Avustralya Ordusu'nun Soyu. Melbourne, Victoria: Allara Yayıncılık. ISBN 978-0-85887-024-6.CS1 bakimi: ref = harv (bağlantı)
- Gri, Jeffrey (2008). Avustralya'nın Askeri Tarihi (3. baskı). Melbourne, Victoria: Cambridge University Press. ISBN 978-0-521-69791-0.CS1 bakimi: ref = harv (bağlantı)
- Gillison, Douglas (1962). Avustralya Kraliyet Hava Kuvvetleri 1939–1942. 1939–1945 Savaşında Avustralya. Series 3 – Air. Volume 1. Canberra: Australian War Memorial. OCLC 2000369.CS1 bakimi: ref = harv (bağlantı)
- Hasluck, Paul (1970). The Government and the People 1942–1945. 1939–1945 Savaşında Avustralya. Series 4 – Civil. Volume 2. Canberra: Australian War Memorial. OCLC 33346943.CS1 bakimi: ref = harv (bağlantı)
- Horner, David (1982). Yüksek Komuta. Australia and Allied Strategy 1939–1945. Sydney, New South Wales: Allen & Unwin with the assistance of the Australian War Memorial. ISBN 0-86861-076-3.CS1 bakimi: ref = harv (bağlantı)
- James, Karl (2012). Zor İş: Bougainville Kampanyasında Avustralyalılar, 1944–45. Port Melbourne, Victoria: Cambridge University Press. ISBN 978-1-10701-732-0.CS1 bakimi: ref = harv (bağlantı)
- Johnston, Mark (2002). That Magnificent 9th: An Illustrated History of the 9th Australian Division 1940–46. Crows Nest, Yeni Güney Galler: Allen ve Unwin. ISBN 1-74114-643-7.CS1 bakimi: ref = harv (bağlantı)
- Johnston, Mark (2005). The Huon Peninsula 1943–1944. Australians in the Pacific War. Canberra: Department of Veterans' Affairs. ISBN 1-920720-55-3.CS1 bakimi: ref = harv (bağlantı)
- Johnston, Mark (2007). İkinci Dünya Savaşı'nda Avustralya Ordusu. Botley, Oxford: Osprey Yayıncılık. ISBN 978-1-84603-123-6.CS1 bakimi: ref = harv (bağlantı)
- Keogh, Eustace (1965). Güney Batı Pasifik 1941–45. Melbourne, Victoria: Grayflower Productions. OCLC 7185705.CS1 bakimi: ref = harv (bağlantı)
- Kienzle, Robyn (2011). The Architect of Kokoda. Sydney, New South Wales: Hachette. ISBN 978-0-73362-763-7.CS1 bakimi: ref = harv (bağlantı)
- Kuring, Ian (2004). Redcoats to Cams: A History of Australian Infantry 1788–2001. Loftus, New South Wales: Australian Military Historical Publications. ISBN 1-87643-999-8.CS1 bakimi: ref = harv (bağlantı)
- Uzun, Gavin (1963). Son Kampanyalar. 1939–1945 Savaşında Avustralya. Seri 1 - Ordu. Volume 7 (First ed.). Canberra: Avustralya Savaş Anıtı. OCLC 1297619.CS1 bakimi: ref = harv (bağlantı)
- Long, Gavin (1973). The Six Years War. A Concise History of Australia in the 1939–1945 War. Canberra: Avustralya Savaş Anıtı ve Avustralya Hükümeti Baskı Hizmeti. ISBN 0-642-99375-0.CS1 bakimi: ref = harv (bağlantı)
- McCarthy, Dudley (1959). Güney – Batı Pasifik Bölgesi - Birinci Yıl: Kokoda'dan Wau'ya. 1939–1945 Savaşında Avustralya. Seri 1 - Ordu. Cilt 5 (İlk baskı). Canberra: Avustralya Savaş Anıtı. OCLC 3134247.CS1 bakimi: ref = harv (bağlantı)
- Palazzo, Albert (2001). Avustralya Ordusu. Kuruluşunun Tarihi 1901–2001. Melbourne, Victoria: Oxford University Press. ISBN 0-19-551507-2.CS1 bakimi: ref = harv (bağlantı)
- Powell, Alan (2003). Üçüncü Güç: ANGAU'nun Yeni Gine Savaşı, 1942–46. South Melbourne, Victoria: Oxford University Press. ISBN 0-19-551639-7.CS1 bakimi: ref = harv (bağlantı)
- Regan, Anthony J .; Griffin, Helga-Maria (2005). Bougainville: Çatışmadan Önce. Canberra: Pandanus Kitapları. ISBN 978-1-74076-138-3.CS1 bakimi: ref = harv (bağlantı)
- Sinclair James (1990). Bir Yol Bulmak İçin: Kraliyet Pasifik Adaları Alayının Hayatı ve Zamanları: Cilt I - Dünün Kahramanları 1885–1950. Brisbane, Queensland: Boolarong Yayınları. ISBN 0-7316-9120-2.CS1 bakimi: ref = harv (bağlantı)
- Sinclair James (1992). Bir Yol Bulmak İçin: Papua Yeni Gine Savunma Gücü ve Avustralyalılar Bağımsızlığa Giden: Cilt II - Barışı Korumak 1950–1975. Brisbane, Queensland: Boolarong Yayınları. ISBN 1-86333-062-3.CS1 bakimi: ref = harv (bağlantı)
- Tatlı, A.J. (1970). "Papua ve Yeni Gine Bölgelerinde Sivil Savaş Zamanı Deneyimi". Hasluck içinde, Paul (ed.). Hükümet ve İnsanlar 1942–1945. 1939–1945 Savaşında Avustralya. Seri 4 - Sivil. Cilt 2 (İlk baskı). Canberra: Avustralya Savaş Anıtı. sayfa 668–708. OCLC 33346943.CS1 bakimi: ref = harv (bağlantı)
- Thompson, Peter (2008). Pacific Fury: Avustralya ve Müttefikleri Japonların Felaketini Nasıl Yendi?. Kuzey Sidney, Yeni Güney Galler: William Heinemann. ISBN 978-1-74166-708-0.CS1 bakimi: ref = harv (bağlantı)
- Wigmore Lionel (1957). Japon İtme Kuvveti. 1939–1945 Savaşında Avustralya. Seri 1 - Ordu. Cilt 4 (İlk baskı). Canberra: Avustralya Savaş Anıtı. OCLC 3134219.CS1 bakimi: ref = harv (bağlantı)
- Williams, Peter (2012). Kokoda Kampanyası 1942: Efsane ve Gerçeklik. Melbourne, Victoria: Cambridge University Press. ISBN 978-1-10701-594-4.CS1 bakimi: ref = harv (bağlantı)
daha fazla okuma
- Robinson, Neville (1981). Savaştaki Köylüler: İkinci Dünya Savaşında Bazı Papua Yeni Gine Deneyimleri (PDF). Pacific Research Monograph No. 2 (Revize ed.). Canberra: Avustralya Ulusal Üniversitesi. ISBN 0909150354.
Dış bağlantılar
- Yerli Piyade Taburu Eylül 1943 - warestablishments.net
- Pasifik Adası Piyade Taburu Ocak 1945 - warestablishments.net